
Commonly, I will instruct student's to utilize the “vertical” and “horizontal” strokes for their initial “warm-ups”. They can then brush the “angle”one, finishing with the “circles”. There exist numerous types/models of warm-up strokes/patterns, and student's are free to use which ever they prefer.
This first “type”, is started at the top of the sheet. The strokes are brushed Left, to Right, Top to bottom. Each stroke should be “set” (with the “Mother Dot”) then be pulled across the page, to be “finished” with a “bounce” (as was described in the “stroke descriptions”). These should be done in varying thicknesses (either “progressively”, or in “groups”). Similarly, the “vertical” strokes, are brushed from the Right to Left side of the paper, began with a “set” (“Mother Dot”) and pulled to the bottom of the page, where it should be “finished” with another “Mother Dot”, or finished with a “tapered” point (alternating each).
The “number” of strokes made per/page is up to the one doing the “warming up”, though for “practice”, One “should” vary the widths (in “groups”) of progressively larger or smaller widths as one progresses across the page.
The “emphasis” on this method, is motioning from/with the waist. The brush/arm are positioned, then the shodoka should perform all motions from their waist. The obvious objective of this practice set is “forward/back”, and “Left/Right”.

The Second “type”, is began at the top (of the Right side). The first stroke, is similar to the “ichi” stroke, but includes the “carpenter's square” (turn) then has the “ichi” stroke (again), then utilizes the “reverse carpenter's square”, followed by a (tapered) “vertical” stroke. One should “make note” of the provided arrows on the example. There is an “alternating” pattern. Once one understands the pattern, the student can vary the sizes of the “pattern” to create as many of these patterns as they wish (across the page). Again, All brush motion should be done with the Waist, this exercise incorporates the “combination” and “alternation” of these motions.

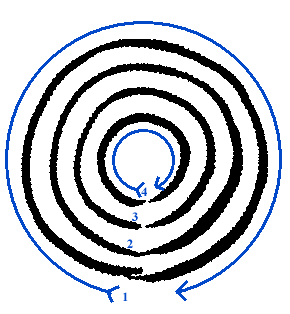
The Third “type”, are “circles” which consecutively become “smaller”. These are started at the bottom of the page, and are brushed to the Left and up and around, then back to the bottom. The “Main” point of this exercise, being Performing these strokes, using the waist as the pivotal point.
No comments:
Post a Comment