Saturday, July 31, 2010

Warm up Exercises

These are what I have my student's use for “warming up” before practicing Shodo. The emphasis should be on using the “body” to do the strokes (as opposed to only using the arm). All motions should come from the waist. The Arm holding the brush, should be positioned to the front of the user. Bent at the elbow (relaxed), with the elbow slightly to the front of the user. The forearm is kept “level” with a “firm” but relaxed grip upon the brush. A variety of grip positions can be used, but I tend to teach (and use myself), a grip that resembles a “plucking” motion, with the finger's slightly (1” to 2”)above the body of the brush hairs. The wrist is kept straight (with the forearm) during the brushing of character’s/strokes).
Commonly, I will instruct student's to utilize the “vertical” and “horizontal” strokes for their initial “warm-ups”. They can then brush the “angle”one, finishing with the “circles”. There exist numerous types/models of warm-up strokes/patterns, and student's are free to use which ever they prefer.

This first “type”, is started at the top of the sheet. The strokes are brushed Left, to Right, Top to bottom. Each stroke should be “set” (with the “Mother Dot”) then be pulled across the page, to be “finished” with a “bounce” (as was described in the “stroke descriptions”). These should be done in varying thicknesses (either “progressively”, or in “groups”). Similarly, the “vertical” strokes, are brushed from the Right to Left side of the paper, began with a “set” (“Mother Dot”) and pulled to the bottom of the page, where it should be “finished” with another “Mother Dot”, or finished with a “tapered” point (alternating each).
The “number” of strokes made per/page is up to the one doing the “warming up”, though for “practice”, One “should” vary the widths (in “groups”) of progressively larger or smaller widths as one progresses across the page.
The “emphasis” on this method, is motioning from/with the waist. The brush/arm are positioned, then the shodoka should perform all motions from their waist. The obvious objective of this practice set is “forward/back”, and “Left/Right”.


The Second “type”, is began at the top (of the Right side). The first stroke, is similar to the “ichi” stroke, but includes the “carpenter's square” (turn) then has the “ichi” stroke (again), then utilizes the “reverse carpenter's square”, followed by a (tapered) “vertical” stroke. One should “make note” of the provided arrows on the example. There is an “alternating” pattern. Once one understands the pattern, the student can vary the sizes of the “pattern” to create as many of these patterns as they wish (across the page). Again, All brush motion should be done with the Waist, this exercise incorporates the “combination” and “alternation” of these motions.

The Third “type”, are “circles” which consecutively become “smaller”. These are started at the bottom of the page, and are brushed to the Left and up and around, then back to the bottom. The “Main” point of this exercise, being Performing these strokes, using the waist as the pivotal point.

The “Cover's”

These are the Final “strokes” that constitute all of the basic strokes necessary to brush all of the kanji that are available to brush (at least in the Japanese lexicon).
The First one, is the “Lion's Mouth”. This stroke begins with the “Mother Dot”, and the brush is moved to the Right with a “slight” rise until the desired distance is attained. Once this point is reached, a “bounce” will be performed,and the brush will motion downward, motioning to the Left. Once the desired distance is attained, the “tip”of the brush will be “pivoted” upon(sweeping the body of the brush slightly to the Left). The “tip” of the brush then motions to the Left, and the body is raised until the finishing “point” is created.


  This next Stroke, is one that is very common amongst many kanji. It is called the “Cover”, officially, it doesn't have a “name” (but “the Cover” is a popular name attributed to it).
The stroke is brushed in the same manor as the “ichi” stroke/kanji is. As the “final” bounce is done, the brush (instead of “rising”) is “drug” downward, and slightly to the Right. This is done to the point that the “tip” of the brush, is equal to the bottom of the initial “Mother Dot's” placement. The “tip” of the brush is then motioned downward, and to the Left. The body of the brush will motion “likewise”, and then will be “lifted” to create the “point” at the exampled position.
The last two strokes in this set are variations on the previous stroke. The first is the "Crown", it is created using the "apricot seed", then brush the "cover".

The last, is the "Treasure Crown". this stroke group is began by first brushing a "Turtle Head"(dot), then brush an attached "Cover".


The Left Hand “Sweeps”

The next “set” of strokes I'll cover, are the “Left Hand Sweeps”. The “First” of these, is the “Pecking Bird” Sweep. This stroke begins with the setting of the “Mother Dot”, and then the “tip” of the brush is pulled to the Left in a Downward “sweeping” action. As the stroke reaches it's desired length, the “body” of the brush is lifted to create the “rising” point (as in the example).

As is evident in the following examples, they are all brushed in similar fashions. The only real “difference” between them, is the overall “length”, and the ending position of the the stroke (which effects the length of the stroke).


The only Left Sweep that has a similarity to the “vertical” strokes”, is the “Variant” of the “Rhinoceros Horn”. It can easily be confused with the “Hanging Spear”(which is a “Vertical” stroke). The “Difference”, is in When/Where the Left Hand “Sweep” of the stroke begins. In the “Hanging Spear” the stroke is “Vertical” until mid-way through it's Stroke. In the “Rhinoceros Horn” Variant, the Left Hand Sweep begins “immediately”.

The Right Hand “Sweeps”

The Next set of “Strokes”, is the “Right Hand Sweeps”. The First of these is the “Floating Goose”. This Stroke begins with the “Mother Dot”, and begins to move “Downward” with a slight “list” to the Left, As the stroke reaches the desired “vertical” distance, the brush is “lifted” slightly (to “thin” the stroke), and then “lowered” as the brush continues the “sideways” portion of the stroke. The “tip” of the brush begins on the Left edge, and as it nears the “turn”, moves to define the “top” edge of the stroke. After the “turn” is made, the brush is lowered (to provide “thickness” to the horizontal portion). The “top” edge of the Horizontal stroke is “curved”to the position where it goes “vertical”, then to the Left. The bottom edge, while “thickening” maintains an “arc” to it, and is pulled past the point where the tip has moved vertical. At this point the brush is “lifted”, as the tip motions to the Left (and upward) creating a “sweeping” point (that distinctively “points” to the Left, at a place “slightly” higher than the beginning position).


This Stroke is called the Long Wave (and it's “variant” the “Playing Fish”) are the most (“commonly”) incorrectly brushed strokes. It requires a lot of practice (for them to be brushed “correctly”). The “Playing Fish” variant, is usually located at the “bottom” of the numerous kanji that it is present in, and the Long Wave commonly dominates the Right side of a character. It should be noted, that the “body” of the brush does the majority of the strokes creation. The “tip” of the brush (after making the “Mother Dot”) Raises slightly, then “sweeps” to the Right, and “downward” (again “slightly). In the Playing Fish variant,Towards the last Quarter of the stroke, it raises again to (almost) the level of the bottom of the (“initial”) “Mother Dot”. The “Bottom” edge of the stroke (being brushed with the “body” of the brush) begins with a “sharp” initial rise, then is quickly angled downward to the Right. As it proceeds through the stroke, it will “thicken”(from a “lowering” of the brush) until it “stops”, and the body of the brush is quickly lifted until the “point” is created.In the Large Wave form, the stroke almost immediately begins to move downward to the right, with the body of the brush forming the Left-hand "corner", and easing pressure until the bottom and Right side form the ending "point" (of the stroke)


The “Playing Fish” (being the “other” stroke commonly “miss-brushed”) Begins as the previous did, the “Mother Dot” is brushed, and the tip is moved to the Right, and creates the “look” of a “shoulder”, with the “tip” creating a curved and downward “sweep”to the Right (all the way to the “point” of the end of the stroke). As in the previous stroke, the “body” of the brush is used to make the “body” of this stroke. Once the “Mother Dot” is completed, the “body” of the brush moves to the Right, then sweeps downward at the desired “angle” while maintaining a (mostly) “straight” edge while “getting” there. The bottom Left “corner”, is (often) most “easily” created, by the use of the “bounce” technique. As this “bounce” is done, the body of the brush is “rolled” while moving “sideways”, and is “lifted” as the bottom edge is created/brought to the ending “point” of the stroke.


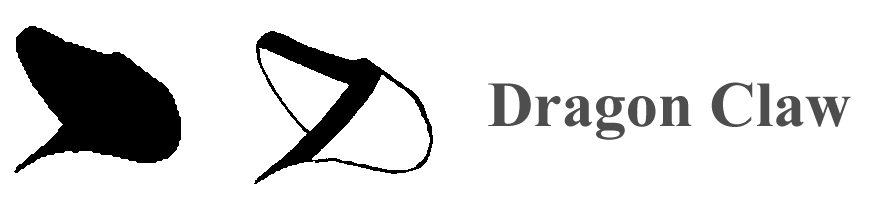
Whew! Now that we're done with “those”, we'll go on to “simpler” strokes. The next one, is the “Golden Cone”. This stroke is began with the “Mother Dot”, and is “raised”(only a “little”) and the top edge (being made by the “tip” of the brush) is taken upward at an angle (approx. 45º). The top edge should maintain a “straight” line, the bottom edge of the stroke, should gradually be “thinned”(by raising the body of the brush) until the desired “point” is created.


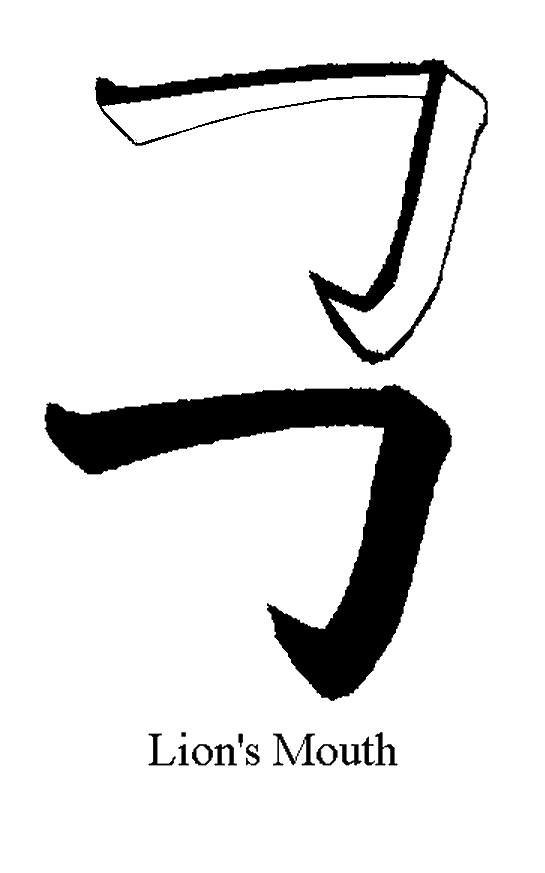
The Next stroke is the “Bent Pagoda”. This stroke begins as a “vertical” stroke (“thinning” slightly from the top, to the level where it “changes”). It should be noted, that there are versions of this stroke that have “longer”, “Vertical” portions, than other's. Once the desired length has been made, the brush is then “lifted”, and (the “tip”) is moved to the Left, and downward then “reset” (which creates the “finished” corner which is evident). Once “set”, the brush should be motioned upward and to the Right with the body of the brush being lifted (to create the finishing “point”).


The Final (Three) versions of the “Right Hand Sweeps” are similar in execution, but mainly differ in the angle of the vertical portion of the stroke.
The First one, is the “Phoenix Wing”. This stroke begins with the “Mother Dot”, then moves to the Right, Raising at a slight angle. As this stroke reaches the position where the bottom of the stroke, reaches the same height as the top of the initial “Mother Dot” placement, the brush is “re-set” (commonly utilizing a “bounce” to do so) creates a “finished” corner, the stroke then continues (with a change in direction). The stroke (now) begins a downward motion(with the “tip” of the brush “now” following the Left side of the stroke), this downward “sweep” arc's to the Right until it is positioned to the Right and beyond the “turn” (made previously in the stroke). As the brush enter's the final portion of the downward stroke, the “tip” of the brush is moved to the “top” of the stroke and continues upward, the body of the brush will (commonly) utilize a “bounce” to create the “turn” where the brush is moved “upward” and is raised to gradually taper to the ending “point”.


The Final Two “sweeps”, are the “Flying Goose”, and the “Bamboo Crecent”. The “final” portion of the discription given for the “Phoenix Wing”, is identical to what is required for the brushing of these two Strokes. It's “my” opinion, that anyone (with any experience, even from the practice of only the previously shown/described “Strokes”) can determine the necessary motions to create these two strokes. If I'm wrong,....I will write some out. But until I am informed otherwise, I'm just going to provide the “visual” examples (and allow you to “practice” them).


The “Vertical” Strokes

  The First of the “vertical” strokes is the “Long Bow” (and also referred to as the “Dull” Hanging Needle). This stroke begins with the “Mother Dot”, and the brush is pulled straight down. Though with the example provided it's difficult to distinguish it, the Left side has a slight “bow” to it. The Right side is a straight vertical line. Like the majority of strokes, this one “finishes” with a “bounce” to clean the ending edge.

  The “Sharp” Hanging Needle, is similar in appearance to the “Dull” version, except that this one “ends” with a “pointed” end. To brush the “point”, One needs to pull the “point” towards the center while the brush moves downward (this will take care of the Left side of the stroke), as the brush is lowered, it should be raised (“lifted” from the paper) in incroments until the “point” is created. This “lifting” process, is began in the final “fifth” of the stroke.
 The “Carpenter's Square” is the student's introduction to a “Calligraphic” 90º angle. This stroke is began much like the “Rising” or “Horse'sl Bit" is. As it reaches the desired horizontal “length”, a “bounce” is performed (to “clean” the corner), and the stroke immeadiatly is pulled “Downward” to the desired length (then is “finished” with a “cleaning” bounce).


  The “Reverse” Carpenter's square begins like the “Dull Hanging Needle”, though when the bottom of the initial stroke is completed, instead of lifting off of the paper, the brush is pulled to the Right, with a slight upward rise until the desired length is reached and then is “finished off” with the “bounce”. 


  The next vertical stroke, is the “Hanging Spear”. This stroke is actually a combination of a “sweep” and a vertical stroke. This stroke is began like the “Dull” Hanging Needle, but at approximately the “Mid-point” of the stroke, it begins to “curves” to the Left. At the “end” of the stroke, it comes to a “point”, similar to the “Sharp” Hanging Needle, but is “curved” to the Left. When brushing the stroke, the student should maintain the “points” course (on the Left side), and “raise” the Right side of the brush as necessary to achieve the desired “point” at the end of the stroke


   The last of the Vertical Strokes, is the “Dancing Spear”. This stroke is almost identical to the “Dull” Hanging Needle, “except” that at the “bottom” of the stroke, the “point” of the brush is pulled to the Left, and the body of the brush is raised until an ending “point” is created at the desired position. The Dark line in the 2nd image, is indicating where the "point" of the brush should remain while making the stroke.


Friday, July 30, 2010

The Horizontal Strokes

The first of the “Horizontal” strokes, is the “Bowed Horse's Bit” (also commonly known as “Ichi”. This stroke is one of the most utilized Strokes (next to the “Mother Dot”). The stroke is began with the placement of the “mother dot”, then the brush is motioned to the Right, with a slight rise, when examined closely, one can see that it also “narrows” slightly as it rises. When the stroke has “risen” to about a third of the stroke's height, the “tip” of the brush levels out and continues to the desired “end point”. The “bottom” of the stroke continues in an “arcing” fashion to the end point of the desired length. Once the desired length is attained, the brush will execute a finishing “bounce” (as described in the “dots” reference page).


Next, is the “Upward Curving Horse's Bit”. This stroke is began with the placement of the “Mother Dot”, then the brush is motioned upward, and to the Right. If one “notes” the edges of the stroke, the “top” edge has a slight “curve” in it (as it raises to the desired position). The “bottom” edge of the stroke, raises in a “straight” line. Like the previous stroke, it is “finished” with the “bounce” to “clean” the edges.

The last of the Horizontal Strokes, is the “Rising Horse's Bit”. The stroke is placed then begins to raise upward and to the Right (similar to the “Upward Curving Horse's Bit”), In “this” stroke, the “top” edge maintains a “straight” edge, and the bottom has an almost impercievable “curve” throughout the stroke. Just as the other horizontal strokes, this one is completed with a “bounce” to clean the ending edge. 


The Beginning Strokes, "Dots"


I'm going to “begin” this “instruction” project, with the brushing of the “Dot's”. These are the “little” strokes that are common within many of the kanji that student's will be practicing. To the average “observer”, they (can) appear to “all be the same”. For the Shodoka, there is a clear distinction between each of them. The “First” (and arguably, the most “important”) is the “Mother Dot”. This stroke, is used at the beginning of virtually “every” stroke.
The “Mother Dot”(hence the “name”). It is neither “complicated”, nor “difficult” to brush. None the less, mastery of this stroke is mandatory to beginning to perform/learn “Shodo”. The stroke begins with placement of the “tip” of the brush against the paper, then a lowering, and placement of the body of the brush at (an approximate) 45º angle, to the lower right of the beginning placement. The angle is not “actually” a 45º (it's closer to a 50-60º), but it seems to be “simpler” for student's to remember a 45º(?). As the student becomes more comfortable, they can “correct” this minor difference in “description”. As the brush is lowered(at the “end”) one can/will apply a light “bounce”(to create the “clean” rounded end of the stroke). It is fairly common for the “bottom” of the “dot” to become “flattened”. This is usually the result of excessive “pressure” (against the brush), which “flattens” the bristles (creating a “flattened” end of the stroke upon the paper). The “bounce”, should be performed without “lifting” the brush from the paper, the “tip” maintains constant contact, and is never lifted/removed from it. There will be various strokes that also utilize this “bounce”, so the understanding, and execution of it should become “second nature” to the student.


The “Profile” (dot) is next, it is one of the most recognized strokes (by both “shodoka” and Shodo “admirer's” alike). The Profile is commonly located “on top” of a kanji. The stroke is began with the mother dot, but instead of “lifting”(and “re-setting”) it remains “down”, and “drags”(slightly) downward (to the Right), it then is “shifted”(again “slightly”) upward and to the Right. The brush is then lifted, leaving only the “tip” in contact with the center of the dot. The brush should then be motioned “downward” to the Left, and lifted simultaneously (which will leave the slight “tail”).

The “Dragon Claw” (at first “glance”) would “appear” to be the same as the “Profile”(dot). Upon closer observation, it can be seen to have distinct “differences”. Those differences are readily apparent when one begins to “make” the actual “stroke”. Once the beginning “dot” is placed, the brush is drawn downward, and to the Right, The example provided illustrates that the “tip” of the brush is drawn downward, and to the right, then is moved to the Left and downward. As it motions to the Left, it is “lifted”(leaving the pointed “tail”). The example drawing (by observation of the inserted “line”) illustrates the path that the “tip” of the brush will take during the brushing of the kanji (“dot”).


The “Apricot Seed” is the next “dot”. This dot can be utilized in varying lengths, and placements. The basic form of the stroke, is began with the placement of the mother dot. Once placed, the brush is drawn downward, and slightly to the left. Once the stroke reaches the desired “length”, the “bounce” is commonly applied (to “clean” the end of the stroke).


The “Plumb Stone” is used in many kanji, and is frequently applied during the creation of “Gyosho” style kanji.To make the stroke, the tip of the brush is placed, then drawn downward and to the Right, when the brush reaches the desired distance, the brush is pulled “slightly” to the Right, and “re-set” (by way of a vertical “bounce”).


The “Turtle Head” dot is most commonly seen on top of the stroke called “The Crown”. It is began by the placement of the dot, then the brush is “swept” to the Right, then is pulled straight down and “finished” with an abbreviated “bounce”.


The last of the “Dot's”, is the “Hatchi” (contraction). These are used in unison and can be seen in various kanji (very commonly in “Gyosho” versions). The dot to the Left, is brushed first, and similar to the “Profile”, and the “Dragon Claw”, this “set” utilizes a “tail”(at the finishing motion of each individual “dot” in the pair). It should be noted, that the “tail”(from the first dot) “points” to the “tip placement” of the second dot. As the second dot is completed, “it's” tail, points towards the bottom of the First dot (creating a “Yin/Yang” sort of feeling to the strokes). 


The Study of Shodo

Shodo, much like a martial art, is studied for a variety of reasons. For most, it's the learning of “how” the Chinese/Japanese kanji should be properly brushed. This is basically a “mechanical” reasoning to it's study. For some, it's a more “mental” pursuit, the study of Shodo requires a “bit” of an “anal” attitude (leaning towards the “perfectionist”) especially when one considers all of the minute features of execution required for many of the strokes, and kanji. Another, is one of a “meditative” (reason) means. It can often be used as an “escape” from one's daily concern's, and allows one to focus on those (many) “details” that are a part of it's practice, and (thereby) “escape” the daily stresses that one may have
. The study of Shodo requires that many minute details of it's practice are adhered to. Contrary to the commonly held believe, it is not necessary that the practitioner (of Shodo) be versed in the language itself. It is very common for a “shodoka”(one who practices Shodo) to be illiterate of the language itself, yet be competent (if not “adept”) at the art of “Shodo”. As one continues with it's “practice”, a student will (naturally enough) “learn” to recognize many of the kanji, and become familiar with their meanings. That doesn't equate to being “fluent” though, it only means they have become “familiar” with the meanings of (some of) the kanji.
I've had numerous student's, who were “artists”(by “hobby”, and/or “trade”) and would begin to study with me, only to “quit”(usually out of frustration with the requirements of it's execution). They (the one's who “quit”) would insist on performing the strokes, in the (or any) manner “they” wished to do so. I found this “odd”, seeing as how it's fairly popular for an artist to study with another (“artist”) to learn their methods of painting. I'm not sure if they viewed it as “beneath” them? (because they equated it to only being a form of “calligraphy”?), or if it was more difficult than they initially believed. “I”, quit worrying about it(long ago).
For my “present” student's (the majority of which are “martial artists”), It's study(“Shodo”) is mostly “mechanical” in nature. It's taught as a requirement for their kyu rank advancement. There's numerous correlations to the practice of a (their) “martial art”, and those will be shown/illustrated, but “their” study, will focus upon the mechanical execution of performing the strokes/kanji themselves.
For the most part, this blog will do likewise (focus on the mechanical execution of the individual strokes).