When a student first begins the study of Shodo, it is common for them to begin to experiment with brushing the various other styles (“beyond” the initial one of Kaisho, or “block-script”). There's nothing wrong, or even detrimental to doing so, they are simply expanding their “skill base”. The thing which should be avoided though, is assuming that one is performing these styles correctly. As long as one is “copying” a known (to be correct) “model”, or “Tehon”, then the student can be assured that they are practicing the correct motions/strokes. Where many students go astray, is when they begin to make assumptions about how every kanji is done in those styles which are unfamiliar to them.
To follow the “path” of Shodo, one assumes the responsibility of following the recognized “guidelines” of a character's creation (“brushing”). There are specific guidelines and rules that required (to be considered “correct”) when performed. Simply using a brush” to write Chinese/Japanese character's, does not mean one is a practitioner of “Shodo” . One can use a pencil to write Kanji, this also doesn't equate to practicing “Shodo”.
The practice of Kaisho, can often be disregarded, by “believing” that it is (considered) to be “Basic”. Kaisho (IMO) can be one of the most frustrating styles to brush (correctly). This mainly is a result of more people who can easily recognize when mistakes are made. By venturing into the “other” methods/styles, the amount of “critique” will become (more) limited (thus reinforcing the individual's “self-belief” of doing the style “correctly”).
Often students who have either gone without (or have simply abandoned) their instructor's guidance, make poor decisions (a.k.a. “assumptions”) about what is considered the correct method of brushing these different styles. Gyosho, is what is commonly associated with being the manner which is usually brushed (in “everyday” writing). It's more relaxed, and all of the same rules for the Kaisho style can still (albeit “loosely”) followed without making any major “flaws” or mistakes. There are certain accepted “short-cuts” and stroke eliminations, that are well known and recognized. This does not equate to allowing the individual to “create” their own “short-cuts” and stroke changes. These would simply be viewed as amateurish attempts at (self-believed) “creativity”. In personal correspondence, these mistakes would no-doubt be over looked/ignored, but if one is planning on “displaying” those pieces, they would only point out the individual's lack of knowledge (and certainly not “skill”).
These same student's (who abandon their training) often turn to “Zen” (style?) Calligraphy. Zen Calligraphy is a more “open” style, and tends to abandon the recognized “rules”(or at least operates outside of them, usually to provide a visual “lesson” from the manner it was brushed). This can amount to an “excessive” use of ink (in effect, “blotting”) which creates a “bleeding” of ink into the paper, or using the “side” of the brush to write with (while not expanding the size of the area utilized for the character, which gives a “blurred” effect). Regardless of the effect attempted, the character remains “legible”. This “style” is rather “individual” in nature, often displaying the artist's own personality and/or “message” that is being displayed by the piece's exhibition. What is “more often” displayed from these attempts, is the artist's own “scattered” thoughts, and lack of (ability to) “focus”.
I've noticed that person's attempting the “Sosho”(fully-cursive”) style of brushwork, tend to be (and is very popular) among the various “American” martial arts schools. This style of brushwork, has a very “defined” set of rules to it's execution. The strokes must be done in a very precise manner, and order, for the character to not be confused with other “similar” kanji. Sosho gives the “illusion” of being “hastily” brushed, very often this style of brushwork is done slowly, and precisely. It's this “illusion”, that causes many student's to falter at achieving the correct appearance. Because it is so little known (as to the correct manner of it's execution) by much of the native Japanese (much less “American's”) population,, it's commonly “assumed” to be just a quickly brushed “Gyosho” (which is far from being accurate). Sosho utilizes strokes, and stroke order from older scripts (from before even Kaisho's inception). Though Kaisho, and Gyosho share many common strokes, Sosho has different “roots”, so the comparison (to them) is often unjustified. It is virtually a separate language unto itself (which may account for over 85% of the Japanese population not being even able to even read it, much less “correctly” brush it).
Regardless of the style utilized, the same guides for “correctness”, should always apply:
Itten shuchu “Perfect concentration”
Aside from the shodoka's (own)“focus” upon the piece, the same should be provided by the piece being brushed (by not “scattering” the observer's ' “vision” as they view the workpiece.
Ichi ji keizoku “One action continued”
Though (also) meaning to “focus” upon the task at hand (meaning the shodoka), the observer's vision should “follow” the strokes of the piece.
Kansho shimbi “Appreciation of beauty”
While including the “correct” manner of brushing the character's, this should include the “synchronicity” of the whole piece. If the work does not “flow” together, the viewer's (attention?) vision becomes “lost”. “Beauty”, is something that is individually graded, but “uniformity” (regardless of content quality) will always be appreciated.
Ningen keisei “The formation of a true human being of the highest human values”
Often considered “esoteric”, (to myself) this means providing “positive” thoughts/idea's/concept's from what the piece is attempting to convey.
All of these guidelines can also be be summarized by the word “Focus”, not necessarily on only “one” of them, but on “all” of them being applied, to both the piece, and with everything we do. If/when a student begins pursuing “styles” which they have no formal training, they (often) wind up “scattering” their own Focus. It should be remembered that “Shodo”, is a path that is based upon, and requires “structure”. When that structure is abandoned, brushwork can simply become a “slapping” of ink upon a piece of paper. The above “rules/guidelines” were adopted to assist/guide the student in maintaining their own “Focus”.

Friday, November 12, 2010
Friday, September 10, 2010
Repeated Practice
There are numerous “icons” that are commonly practiced by Shodo practitioner’s. These are often mutually shared/identified with other practiced “arts”. One of the more common one's, is the kanji for “eternity”(“towa”, or “ei”). This kanji is often claimed to possess all the essential strokes necessary for the practice of Shodo (presented in their most “basic” form). In the view of practitioner’s of “Iaido”(sword-drawing/cutting), or “Kendo”, this kanji also represents all the essential “cutting strokes”(in their most basic form). The numerous forms of Karate embrace various other kanji (as well as “Towa”) depending on the individually decided emphasis by/for their practitioner's.
The correlating factor between all these subjects, is the acceptance that the practitioner is only offered a “single” opportunity to perform a required action. In the case of the sword practitioner, if their “cut” is done incorrectly, or inaccurately, they may not have a “second chance”. The same is true for the karateka. These, and the numerous “other” martial arts, depend on accuracy and precision as well as their individual actions being performed “correctly”(and without the ability to “repeat/fix” a mistaken action). Shodo, only allows a “single” opportunity to perform each “stroke” of the brush(any attempt to “go-back” and “fix” a mistaken stroke, is rarely possible, and is always apparent).
For myself, and in the instruction of my students (in both “Shodo”, and “RyuTe”), the necessity of doing an action “the first time” is an essential attribute. Students (be they of “Shodo”, or some martial art), can often get into a melancholy state of having a “good-enough” attitude regarding their practice of their chosen field of study. The practice of Shodo can/will train the student to focus upon the required intricacy’s of the art (with the thought, that these attributes will be transferred to their “other” practiced arts).
The “mistake” that I see being made by many student's (be it in Shodo, or in the practice of a martial art) is that the student “assumes” that the motion (or the “stroke”) must be made exactly as the instructor performs it. There are numerous “details” of an action that need to be followed/performed, but as long as the “details” are being performed “correctly”, the action may appear(slightly) “different”, yet still be being done “correctly”. “Individuality” will (definitely) become apparent between practitioner's (be they “Shodoka”, or “karateka”), yet the “core” motion is still identifiable (as having been performed “correctly” or not).
It is common to observe a practitioner of Shodo, repeatably practicing the kanji “ichi”(“one”). This is arguably the most “basic” stroke practiced. It is utilized in the vast majority of kanji, and is often performed “incorrectly”(from the Shodoka's point of view). Ichi, is more than “just” a “straight” line. In fact, there is nothing “straight” about it. The stroke begins at a 45º angle, then motions upward, narrowing slightly, then curves to the right, while “thickening” towards the finishing position. The stroke is then “finished” with a “cleansing bounce”, and the brush is lifted to the left (letting the “tip” trail into the body of the initial crossing stroke). Though a “straight” line, could also be identified as representing “ichi”, this would be identified as (being)“flawed”, or “incorrect” (from the Shodoka's point of view). Just as “punching” is often repeatably practiced by karateka, “ichi” is practiced by the Shodoka(for much the same reason).
Element's of Practice
As one begins the practice of Shodo, there are basic “constants” to keep in mind. It should be noted (by student's of RyuTe), that the study of “Shodo”, is very similar to the practice/study of “RyuTe”. Both have numerous “details” that need to remain constant throughout the execution of performing the various motions.
First is the student's “use” of the body. Just as in RyuTe, Shodo requires the student to utilize “body” motion with all of the required actions(“strokes”).Though only being utilized from “the waist up”, the legs must (as in RyuTe) be in a position of stability (to allow the required actions of the arms to occur). Attempting to use “only” the arm (motions), will result in “oddly” shaped strokes (just as doing so in RyuTe, will result in oddly executed techniques). This “stability”, is often maintained from sitting in “Seiza”(or through the use of a “zen bench”, which allows the legs to be placed similar to Seiza, while sitting upon a short “bench”). If/when sitting on a “western” style chair, both feet should remain upon the floor, with the back straight (no “slouching”, or leaning back against the backrest of the chair).
Second, would be the use of “breath” in conjunction with the actions involved with performing the strokes. When one attempts to “hold” their breath, they will find that the strokes will often become “jagged”, and/or display an (obvious) “Jerkiness” to them. When one steadily “exhales”(while performing a stroke) the lines will tend to be “smoother”, allowing the student to concentrate on the varying “width” requirements of the stroke being performed. With practice, one learns to “regulate” this exhalation, so a single breath is all that is necessary for each kanji being brushed (just as when performing “multiple” technique applications, a single “exhalation” is done).
A large portion of the beginning Shodoka's (student of Shodo) time, is spent on “how” to create the various strokes needed to create the required kanji. There are a “few”, that only require a couple of strokes, but the majority have multiple variations of the individual strokes. The “first” of these strokes, is refereed to as the “Mother Dot”.
Every Stroke Begins With the “Mother Dot”(hence the “name”). It is neither “complicated”, nor “difficult” to brush. None the less, mastery of this stroke (or “Dot”) is mandatory to beginning to perform “Shodo”. The stroke begins with placement of the “tip” of the brush against the paper, then a lowering, and placement of the body of the brush at (an approximate) 45ºangle, to the lower right of the beginning placement(for student's of “RyuTe”, this should be especially easy to remember, LOL).
As the brush is lowered(at the “end” of the main “stroke”) one can/will apply a light “bounce”(to create the “clean” rounded end of the stroke). It is fairly common for the “bottom” of the “dot” to become “flattened”. This is usually the result of excessive “pressure” (against the brush), which “flattens” the bristles (creating the “flattened” end of the stroke upon the paper). The “bounce”, should be performed without “lifting” the brush from the paper, the “tip” maintains constant contact, and is never lifted/removed from it until the stroke is completed. There will be various strokes that also utilize this “bounce”, so the understanding, and execution of it should become “second nature” to the student.
The “next” motion/stroke, will be the horizontal line. For learning purposes, it is usually the kanji “ichi”(“one”) that is used for learning this stroke. If one “notices”, there are no (perfectly) “straight/level” and/or “straight/vertical” lines performed in “Shodo”. Every one will have some distinguishing “variance” that eliminates a (any) completely “straight” lines from the kanji. In the case of “ichi”, once the placement of the “Mother dot” is done(with no ending “bounce”) the brush remains in contact with the paper, and is drawn (as in “pulled”) upward, and to the right of the beginning (“Mother dot”). The stroke “raises” slightly, and levels out until it reaches the end of the stroke. Once there, “then” the “bounce” is applied( to provide a “clean” end to the stroke). If one notes the “example”, the bottom edge of the ending stroke's placement, will be (almost) even with the “top” of the initial “Mother dot's” placement.
It needs to be remembered (by the student) that the brush is to remain “vertical” throughout all of the motions being done (while practicing any/all of the motions/strokes in Shodo). Although the student (usually) is beginning with only practicing “Kaisho”(“Block”style) character's, if one begins “leaning” the brush, during any of the motions, when attempting the “other” styles, they will encounter numerous problems with the ability to do so(and the ability of making them “look” correct).
Just as with any “martial art”, Shodo has it individual nuances that enable it to be done “correctly”. There exist several “teaching” methods, and schools of Shodo instruction. The methods that I utilize, are those taught through the Nihon Shuji (The Japan Calligraphy Education Foundation). They offer a very “affordable” course of study (via “postal mailing's” of the assignments). Just as with a martial art, student's are “ranked” after submitting the initial “model”. Rankings begin at/with 10th kyu(referred to as “shinkyu”, or “new/beginning” kyu rank), and count down to 1st kyu, then begin counting “up”(1st Dan, 2nd Dan, 3rd Dan, etc.). Student's are sent monthly assignments, along with completed examples and descriptions. When completed, the student will mail their “assignment” back to the association. These are then “graded” and returned, with any corrections noted, and will include their next month's assignment.
The association's “schedule” for progression(in “rank”), is essentially “3” years (to attain 1st Dan). This will obviously vary depending upon an individual's ability. “Dan” ranking provides acknowledgment of instruction “ability/recognition” for progressive “age groups”( 1st Dan, for small children, 2nd Dan for teens, and 3rd Dan for Adults, 4th Dan recognizes the student as a general “Instructor” of Shodo).
Thursday, September 2, 2010
Shodo “Table” and “Seiza Bench”
Although students can easily utilize a standard table and chair for practicing Shodo, I've found the use of a “Seiza Bench”, and an appropriately sized table to be “easier” to use. If these are able to be used, the student will find the ability to use one's “body” to be much easier to do.
I've provided the appropriate dimensions for 2 sizes of tables (one for “groups”, and one for “personal” use). These will require appropriately sized “chairs”(in this case, “Seiza” benches), which I have also provided dimensions for. These “benches” will work for the majority of student “sizes”. If you, or another student requires a “different” size (Larger, or smaller) these can be easily adjusted for (when making them).
When using these items, a student can more easily use one's “body” while executing the basic strokes. This ease of “ability” (to use one's whole body), will allow the student to add (the “appearance” of ) “flow” to the project being brushed.

For the “tabletop”, one can use a 4' X 8' (“plywood” sized) sheet of “layered” plywood. Although “particle” board could be utilized, “I” would recommend against it. “Particle” board, tends to warp, and will “disintegrate” if it becomes wet, and is most susceptible to damage (from any abuse, even accidental). For a “personal” table, one can utilize a ¼ sheet (2' X 4') of plywood.
If one is “really” poor, they can use “cinder-blocks” for support “legs”(and are often “close” to the required height), but I would recommend purchase of (threaded) “table-legs” with the appropriate “mounting” brackets. These can be easily sawed off to the correct height if/when required (and being “threaded”, can be removed for storage of the table when not in use).

The 4' X 8' sized table will “compactly” sit 6-8 students (if necessary), though “4 or 6”(students) is the more common number which would be planned for. The smaller/personal sized one (2' X 4') can sit “2” if/when required. It must be noted, that “room” for the individual “tehon” examples, be maintained.
The entire table top should be covered with “felt” (and for “obvious” reasons, I would recommend “black” for a color, though other colors could be utilized, for “aesthetic”reasons, “black” is easier to maintain). This covering eliminates the need for any “under sheet” for the student's paper (to prevent “bleeding” through).
Wednesday, September 1, 2010
Creating a personal "Seal Stone"
If you have decided to “make” your own Seal Stone, then you will need to determine which kanji to utilize (if your not “Japanese” to begin with). It will be necessary to “sound out” your name “phonetically”, into as many syllables as are needed. It should be remembered, that the “idea” is to make it legible to a Japanese individual. If your name utilizes sounds unfamiliar to them, they won't understand how it's supposed to be pronounced. There are commonly accepted “sounds” which the Japanese utilize when these unfamiliar sounds are encountered.
Of these, the ones most common to cause difficulty, are the “L” sound (usually substituted with an “R” sound), and the “V” sound (usually substituted with a “B” sound. It sounds a little “racist”, but if one imagines a (bad) movie (where someone is trying to “sound Japanese/Chinese”) you will actually get very close to how a Japanese person might pronounce those sounds.
Once you have broken your name down to syllables, search through the provided lists(well, for “my” students, LOL), or dictionary's to find the individual sounds represented by the kanji. There are (usually) numerous choices of each. On “rare” occasions, you might locate words which “match”, or are very close to the name/sounds given.
It becomes a time consuming process, but if one investigates the meanings behind each “match”, one can (usually) find a string of equivalent sounds, with “meanings” that will be acceptable for use. But, if your going to the trouble to make a seal, you might as well make one that has “some” sort of legible meaning. Understand, that it is NOT the meaning which is important, it's the SOUND (of the kanji being used). What one “usually” winds up with, are a grouping of words/meanings that are assembled similar to a “haiku” or “poem”(without the usual “particles” of speech that would commonly be utilized when writing).
For a name, or organization’s seal, it is common to utilize the “Tensho” (“seal”) style of writing(“font”?). For any other type of seal, it's the individual's choice.
When making a seal stone for one's name, the kanji is carved “into” the stone. If you are doing a “pen-name”, those are usually carved in relief (you carve away all but the kanji). Either method is acceptable for “other” types of uses, though many “businesses/organizations” will often use the 2nd method for representative “stamps”.
Once one has determined “what” to put upon their seal, you then have to carve it. The straight “name seal” isn't too bad. It's just a matter of “reversing” the kanji (simply done on a computer within most graphics programs) and print out a copy (for reference).
The next step is to transfer the image onto the stamp itself. This is usually done “freehand”(using your “reversed” and printed out copy for reference).
There are traditional “chisel's” of varying sizes (which make the carving easier), but they do require practice to use effectively. I've found that “if” one is careful(and has one) a “Dremel” tool, with a very small “bit”, will work quite well. The most challenging task, is making sure one chisel's “deep”(enough) into the stone, for the resultant “image” to transfer when “inked”(simply “scratching the surface will rarely work).
Once one begins one of these “projects”, you will understand why person's will charge (quite a bit) for doing them(by “hand”). If/when you make a “mistake”, you get to start over,...”completely”. You must sand the entire surface “smooth” (again) before “restarting”. A number of places are available to “carve” you a stone “on-line”. Most will utilize engraving machines (which can do a remarkable job). But depending on your attitude about it, they have the/that “mechanically” made “Look”(to them). The one's done by hand are extremely difficult to reproduce (exactly as done). The machine made one's, are easily reproduced, which would be fine if one uses it for a “business” purpose. For a personal “name seal” though, “I” prefer the hand carved one's.
Beginning to practice Shodo
When first beginning to learn the use of the brush with Shodo, it's difficult for the student not to treat it as something that does the work “for you”. It will do, exactly what “you” make it do. Though different brushes will sometimes have individual peculiarity’s, the majority will react in a similar fashion to any other. That's not to say that there isn't “Good”, and/or “Bad” brushes, only that most will do the job required (if the “'handler” is skilled enough to compensate for an individual brushes tendency's and/or inadequacy’s). It's for that reason, that the initial purchase of a “Good”, “Quality” brush is the most important item to acquire. Though “poorer” brushes may be able to be handled/used by an experienced shodoka, the beginner should always use a quality brush to learn and practice with. The brushes I use, come from the Nihon Shuji and are of as high a quality as your going to get (depending on “how much” you wish to spend). They also happen to be the least expensive I have found (for the same quality, and frankly, I've located none of any “higher” quality).
When you first purchase a brush (Fude), the hairs of the brush, will have been soaked in a “rice starch”. This is of similar consistency to “glue” (and serves much the same purpose). Only the beginning 1/3rd of the brush (from the “tip”) will need to have this “starch” rinsed out of it (for use) when first beginning to use the brush for Shodo. Only removing this amount will assist the brush in maintaining a semi “stiff” state (making it easier to create the “Kaisho” style of kanji/strokes that the student will be initially working with). As the brush is used, and cleaned, varying amounts of the starch will be removed, and the brush will become (hopefully “gradually) “looser” and more supple. If this happens slowly, the student will often not even notice the change in suppleness, and will naturally adapt to the minor changes needed to perform the strokes as it does so. It is not uncommon to become “comfortable” with a particular brush, knowing exactly how “it” responds to your direction. Person's often get quite “possessive” of a personal brush, and much like a “sword”, it's considered an insult to use a brush without first asking permission.
Once the brush has been initially “cleaned” of starch, the student can begin to use it for practice. For this course, we will be using bottled ink. The difference in quality from “ground” ink is negligible at this level of study, and save class time(from not having to “grind” one's ink). We will (at some point) spend a portion of 1 of our class periods to have student's “grind” their own ink (for that class). The ability to produce one's own ink, though sometimes inconvenient, can provide a variety of “appearance” from the manner/consistency that one grinds the ink-stick (“lighter”, “darker”, varying shades, etc.). It also is vastly “cheaper” to produce one's own ink, and removes the necessity of “proper” storage (“bottled” ink, can go “rank”, and if/when it does, it smells BAD).
In order to “hold” the ink (for us to use it), it will be placed in an inkwell called a “Suzuri”. The suzuri is also used to grind the inkstick on, mixed with water, and collected in the deep end of the suzuri. The brush itself, will hold a larger amount of ink than is initially believed. With practice, it's common for “poems/sayings” and such, to be done with a single “loading” of a brush with ink (this is considered an exhibition of “skill” by the Shodoka). If one is brushing a large document (with a number of kanji per line), it's usually the “norm”, to do each line with a single “loading” of the brush with ink.
When one first places the brush into the ink, the brush will absorb a large amount of ink. With practice, the student will learn how much will need to be removed (before beginning to brush). Experience will show the student how much ink should be left within the brush, for the particular project they are working on at the time. For “practice”, it's not relevant “how many” times one needs to “re-load” the brush. If the student is more comfortable, they can re-load for every stroke (though having to do so, will generally make the student frustrated enough to start loading more ink on to the brush).
The student should (when practical) use the beginning of practice time “warming up”. This is to allow the student to both “relax”, and to “focus” on the practice at hand. Once one has learned all the basic strokes, and is confident in their execution, the practice of “grinding” one's ink is used for this “focus and relaxing” time.
“Warm-up Strokes” are used (initially) to reinforce the student's use of the “whole” body, while performing the required strokes. Student's who “get in a hurry”, will often use only the arm/wrist to make the brush stroke actions (and it becomes very obvious when they do). All the brush movement's, should come from the waist, the wrist and forearm, act as one. The elbow (of the brush hand) should rarely motion beyond it's normal position (at one's side, and slightly in front of the shodoka.
Before the brush is “placed”, the student should take a short “breath” (inhaling), then, as the brush is placed, and moves through the required strokes, the student should “exhale” accordingly (“pausing”, in that exhalation, as the brush “pauses” during the brushing process). The beginning shodoka, will commonly utilize several (separate) “breath's” during the brushing of the individual strokes of a kanji. As they become more comfortable with the process, they will become “smoother” with varying the level of exhalation during this process.
As the student prepares to make their first stroke (of the present project), they should empty their mind of any other (distracting) thought's or concerns. Their only thought should be to envision the kanji (or the individual stroke) they are about to brush in their mind. The student should then “transfer” it (the desired “stroke”, or whole kanji) upon the paper, and place the brush where they are “seeing” it (in their mind). For this reason, it becomes important that the (beginning) student have a “Tehon” (example) to work from.
The study of “Graphology” (Hand writing analysis), has been recognized in the “western” world (Europe) since the 17th Century. It was also notated in China during the early 12th Century. This “science” is utilized today by such organizations as the FBI and Interpol (for developing “personality profiles” of/for criminals). In the east (Japan, China) Business's commonly utilize it in/for career job placement (within their organizations).
In Japan, It is believed that one's “soul” is expressed through their “brushwork”. Various martial arts students utilize the practice of “copying” the writings of famous “swordsmen”, “karateka”, and individual's of noted martial accomplishments, in the attempt to “emulate” their mannerisms/style (through the “copying” of their calligraphic “works”).
With this knowledge in mind, the student will note that if/when “they” have some “issue”, or “problem” (on their mind at the time, during “practice”) they will usually experience “problems” with their execution of the strokes, the “sizing” (of “characters”), maintaining vertical alignment, etc. Mental state, can play an important factor in one's ability to do their brush work (to their satisfaction).
The practice of Shodo can (often) be utilized to assist in alleviating the daily “stresses” that one experiences (one can correlate it to being a form of “meditation”). By learning to “empty” those problems/thoughts from their consciences(in order to “focus” on the practice of Shodo), they can alleviate the (internal) stresses that they have (freeing their thoughts, to “focus” on present “needs”).
When people state that they “need a break”, this usually means that they need to “escape” from the stresses that they are presently experiencing. Shodo, can be (and is) a method of doing so, without the requirement of anything beyond the basic “tools” that are required for it's practice.
I often encourage student's to invest in a “brush-pen”, these are ink “pen”(size/shape) utensils sold at various art supply stores. They will have a “brush”(type/style) writing end, and have a “cap”, so they can be closed and conveniently carried/stored when not in use. Some are of the “magic marker” type, and some actually have a reservoir of ink contained within them. This allows student's to be able to practice the brushing of “small” character's and strokes, regardless of their location, or the time they have available to do so. Also, the writing of “small” kanji, is something that is not as commonly practiced when working with a brush. The “standard” practice brush, has (approx.) 2-2 1/2” hairs, though “small” character's “can” be brushed with this size of brush, it is more common to utilize a brush which only has “hair's” of 1/2-1” in length. From the ability to utilize a “brush-pen”, one will have the (convenience) ability to practice (brushing “small” character's) without the need to “drag out” (and of course “clean-up” when done) all the standard practice materials (the “brush”, “suzuri”, “ink” and paper).
Another practice method that I have my student's utilize, is to purchase a small (8” X 12”) “chalk board”. The student need only use “water” (instead of “ink”) upon the surface, which is then wiped away after making a stroke/kanji. This is an easy (and inexpensive) method of practicing individual strokes, or kanji without “wasting” paper/ink (on something you obviously don't wish to retain).
“Financially”, the practice of Shodo is (fairly) “inexpensive”. The initial investment is commonly around $50 (when purchased through the association). A beginner's brush, can be purchased for around $8-12, a suzuri (inkwell) for approx. $15, and the “ink”(sumi) depending on the amount, for around $4 (for 360CC of ink). This amount of ink, “should” last the student for a couple of months (of “regular” practice). For “paper”, the use of old phone-book listings, or newspaper, can be used (for “practice”). These have similar characteristics to the “rice” paper that is usually used, and is “free”. Though “rice paper” (which is actually made from “mulberry”) is available at “most” art supply stores, it is MUCH cheaper when purchased through the Calligraphy Association(and can be purchased in “bulk”, of “which-ever” size the student would like).
The Association has a variety of “lined” practice sheets available. These can prove useful to the beginning student, as they have faint “lines” upon them for placement/reference of the character's. If one joins the association, they will receive their assignment’s with these lines shown on the examples provided(of the monthly assignment's). These “practice” sheets, come in a variance of “lined” styles, they are designed for 4, 6, 8 and even 28 character practice (all being on an approx. 12” X 20” sheet). ALL of these are about $4 for 100 sheets These will assist the student in becoming familiar with the correct “spacing” of character's upon a piece of paper (when doing a project of their own).
As when beginning to learn any new activity, one must spend a fair amount of time on “basics”. In the case of Shodo, that entails learning the correct manner of creating the initial strokes (as I have presented here). To some, this is a boring endeavor, and to some degree I would agree. None the less, it is a necessary step in being able to create the character's correctly. If these individual strokes are done incorrectly, then the whole character/kanji will have either a “jumbled”, or a “boxlike” look to it. Kanji should have a look of “wholeness” to them, they shouldn't look as if they were “thrown together”. This is why student's should always use a “practice model”(Tehon) to work from. With time/practice student's will aquire an “eye” for correctness. As with any learned skill, this “inner-eye” will gradually become developed to where one requires a “model” less, and less. This “inner-eye” does not necessarily develop equally with one's ability level(of using a brush).
The (possible) “draw back” to this (development of an “inner-eye”), is that one tends to become “critical” of examples of brushed calligraphy (of their own, or of others). As “Shodoka”, we strive for “perfection”(of execution), but we “rarely” attain it(and will quickly recognize it in viewed examples). We need to remember, that we are “human”, and perfection is rarely(if “ever”) attainable. The challenge, is to “attempt it”. We must learn to accept/recognize when an attempt (be it by ourselves, or others) is “close”.
On "Squareness".......
On several occasions, over the previous month, I have meant to make mention of something to my student's that I am going to “point out” here. Although “technically” there are no “square” shapes (within the kanji), the forms that are close, come in “2” variations.
The “first”, is of the “empty” square. The “second” is the “filled” square. At first glance, one may “miss” the subtle difference between the two. If the “square”(or “box”) is “empty”, then the “bottom of the Right hand “leg” will be concealed within the lower stroke (ie. “non-protruding”).

But, If the “box”, has something within it, then the Right hand leg will “protrude” from the lower (bottom) stroke

This “standard” doesn't change, even when “both” elements are contained within the same kanji.

Although a "minor" point, it none-the-less, is an important one to remember.
Monday, August 2, 2010
The “Hiragana”
The Hiragana, are the phonetic character’s that Japanese utilize for writing “domestic”(Japanese) words that they either aren't familiar with, or simply for convenience.


Click on image to enlarge
This chart illustrated the kana that require "sound" changes.


Click on image to enlarge
Sunday, August 1, 2010
The Katakana
The Katakana are what the Japanese use to write “foreign” words (to the Japanese). They can (and are) also used as/for “emphasis” (much like a “bold” font is utilized). For my student's purposes, the Katakana are “mostly” going to be used for writing “names” (usually of/for their students), and commonly upon “certificates” and such.
I usually show my student's the “Katakana” before showing them the “Hiragana”. This is mostly because it is rare for the average American to be writing anything in Japanese anyhow (and if they do, it's usually by way of “kanji”, rather than “Hiragana”).
The “use” of the Katakana, is purely “phonetic” (for “names”, and American “words”). The ability to “decipher” a person's name, takes a little practice, and a little experience with the accepted methods of translating those names when using the Katakana. I am going to provide a couple of “charts” I've made that I provide to my students (for this purpose).
The Katakana themselves, were derived from “pieces” of the kanji that their “sounds” came from. For my student's (and our purposes here) I'm don't get into that aspect of the “kana's” history.
The Standard “Katakana” Chart:
 (Click on Image to enlarge)
I am also providing a “Sound Change” chart which is used for various inflected, and “odd” (at least to the Japanese language) sounds.
Katakana Sound Change Chart:

(Click on Image to enlarge)
I usually show my student's the “Katakana” before showing them the “Hiragana”. This is mostly because it is rare for the average American to be writing anything in Japanese anyhow (and if they do, it's usually by way of “kanji”, rather than “Hiragana”).
The “use” of the Katakana, is purely “phonetic” (for “names”, and American “words”). The ability to “decipher” a person's name, takes a little practice, and a little experience with the accepted methods of translating those names when using the Katakana. I am going to provide a couple of “charts” I've made that I provide to my students (for this purpose).
The Katakana themselves, were derived from “pieces” of the kanji that their “sounds” came from. For my student's (and our purposes here) I'm don't get into that aspect of the “kana's” history.
The Standard “Katakana” Chart:

I am also providing a “Sound Change” chart which is used for various inflected, and “odd” (at least to the Japanese language) sounds.
Katakana Sound Change Chart:

(Click on Image to enlarge)
Brushing “1” thru “10”
The First ten numbers are useful for the beginning student to practice many of the basic strokes. I will present them here, with the various “strokes” identified and explained as needed.
Ichi is a single stroke character (“kanji”). The stroke is began with the placement of the “mother dot”, then the brush is motioned to the Right, with a slight rise, when examined closely, one can see that it also “narrows” slightly as it rises. When the stroke has “risen” to about a third of the stroke's height, the “tip” of the brush levels out and continues to the desired “end point”. The “bottom” of the stroke continues in an “arcing” fashion to the end point of the desired length. Once the desired length is attained, the brush will execute a finishing “bounce”


Ichi is a single stroke character (“kanji”). The stroke is began with the placement of the “mother dot”, then the brush is motioned to the Right, with a slight rise, when examined closely, one can see that it also “narrows” slightly as it rises. When the stroke has “risen” to about a third of the stroke's height, the “tip” of the brush levels out and continues to the desired “end point”. The “bottom” of the stroke continues in an “arcing” fashion to the end point of the desired length. Once the desired length is attained, the brush will execute a finishing “bounce”

Ni “Two”
Ni is a two stroke kanji. The first stroke, is an “upward curving horses bit” , the second, is “Ichi”

San “Three”
San is a three stroke kanji. The first stroke, is an “upward curving horses bit”, the second is a “rising horses bit”, and the third (bottom) is “Ichi”

Shi “Four”
Shi, is a five stroke kanji. The first stroke is a “Long bow”, the second is a “carpenter's square”, the third is a “rhino horn”, the fourth is a variation on the “bamboo crescent“, and the fifth is “ichi”.

Go “Five”
Go, is a four stroke kanji. The first stroke is a “rising horses bit”, the second is a “Long bow”, the third is a “carpenter's square” and the fourth is “ichi”.

Roku “Six”
Roku, is a four stroke kanji. The first stroke is a “turtle head” dot, the second is “Ichi”, the third is a “pecking bird”(variant), and the fourth is a “plumb stone”(variant).

Nana “Seven”
Nana, is a two stroke kanji. The first stroke, is a “rising horse's bit” (variation), the second is a “floating goose” (variant).

Hatchi “Eight”
Hatchi, is a two stroke kanji. The first stroke, is a “Rhino horn” (variation), the second is a “playing fish” (variation).

Ku “Nine”
Ku, is a two stroke kanji. The first stroke, is a“Rhino horn” (variation), the second, is a “Phoenix wing”.

Ju “Ten”
Ju (or “to”, is a two stroke kanji. The first stroke is “ichi”, the second stroke is a “long bow”.

Saturday, July 31, 2010
Warm up Exercises
These are what I have my student's use for “warming up” before practicing Shodo. The emphasis should be on using the “body” to do the strokes (as opposed to only using the arm). All motions should come from the waist. The Arm holding the brush, should be positioned to the front of the user. Bent at the elbow (relaxed), with the elbow slightly to the front of the user. The forearm is kept “level” with a “firm” but relaxed grip upon the brush. A variety of grip positions can be used, but I tend to teach (and use myself), a grip that resembles a “plucking” motion, with the finger's slightly (1” to 2”)above the body of the brush hairs. The wrist is kept straight (with the forearm) during the brushing of character’s/strokes).
Commonly, I will instruct student's to utilize the “vertical” and “horizontal” strokes for their initial “warm-ups”. They can then brush the “angle”one, finishing with the “circles”. There exist numerous types/models of warm-up strokes/patterns, and student's are free to use which ever they prefer.
This first “type”, is started at the top of the sheet. The strokes are brushed Left, to Right, Top to bottom. Each stroke should be “set” (with the “Mother Dot”) then be pulled across the page, to be “finished” with a “bounce” (as was described in the “stroke descriptions”). These should be done in varying thicknesses (either “progressively”, or in “groups”). Similarly, the “vertical” strokes, are brushed from the Right to Left side of the paper, began with a “set” (“Mother Dot”) and pulled to the bottom of the page, where it should be “finished” with another “Mother Dot”, or finished with a “tapered” point (alternating each).
The “number” of strokes made per/page is up to the one doing the “warming up”, though for “practice”, One “should” vary the widths (in “groups”) of progressively larger or smaller widths as one progresses across the page.
The “emphasis” on this method, is motioning from/with the waist. The brush/arm are positioned, then the shodoka should perform all motions from their waist. The obvious objective of this practice set is “forward/back”, and “Left/Right”.

The Second “type”, is began at the top (of the Right side). The first stroke, is similar to the “ichi” stroke, but includes the “carpenter's square” (turn) then has the “ichi” stroke (again), then utilizes the “reverse carpenter's square”, followed by a (tapered) “vertical” stroke. One should “make note” of the provided arrows on the example. There is an “alternating” pattern. Once one understands the pattern, the student can vary the sizes of the “pattern” to create as many of these patterns as they wish (across the page). Again, All brush motion should be done with the Waist, this exercise incorporates the “combination” and “alternation” of these motions.

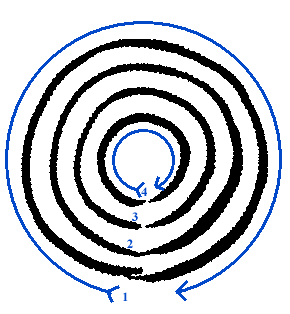
The Third “type”, are “circles” which consecutively become “smaller”. These are started at the bottom of the page, and are brushed to the Left and up and around, then back to the bottom. The “Main” point of this exercise, being Performing these strokes, using the waist as the pivotal point.

Commonly, I will instruct student's to utilize the “vertical” and “horizontal” strokes for their initial “warm-ups”. They can then brush the “angle”one, finishing with the “circles”. There exist numerous types/models of warm-up strokes/patterns, and student's are free to use which ever they prefer.
This first “type”, is started at the top of the sheet. The strokes are brushed Left, to Right, Top to bottom. Each stroke should be “set” (with the “Mother Dot”) then be pulled across the page, to be “finished” with a “bounce” (as was described in the “stroke descriptions”). These should be done in varying thicknesses (either “progressively”, or in “groups”). Similarly, the “vertical” strokes, are brushed from the Right to Left side of the paper, began with a “set” (“Mother Dot”) and pulled to the bottom of the page, where it should be “finished” with another “Mother Dot”, or finished with a “tapered” point (alternating each).
The “number” of strokes made per/page is up to the one doing the “warming up”, though for “practice”, One “should” vary the widths (in “groups”) of progressively larger or smaller widths as one progresses across the page.
The “emphasis” on this method, is motioning from/with the waist. The brush/arm are positioned, then the shodoka should perform all motions from their waist. The obvious objective of this practice set is “forward/back”, and “Left/Right”.

The Second “type”, is began at the top (of the Right side). The first stroke, is similar to the “ichi” stroke, but includes the “carpenter's square” (turn) then has the “ichi” stroke (again), then utilizes the “reverse carpenter's square”, followed by a (tapered) “vertical” stroke. One should “make note” of the provided arrows on the example. There is an “alternating” pattern. Once one understands the pattern, the student can vary the sizes of the “pattern” to create as many of these patterns as they wish (across the page). Again, All brush motion should be done with the Waist, this exercise incorporates the “combination” and “alternation” of these motions.

The Third “type”, are “circles” which consecutively become “smaller”. These are started at the bottom of the page, and are brushed to the Left and up and around, then back to the bottom. The “Main” point of this exercise, being Performing these strokes, using the waist as the pivotal point.
The “Cover's”
These are the Final “strokes” that constitute all of the basic strokes necessary to brush all of the kanji that are available to brush (at least in the Japanese lexicon).


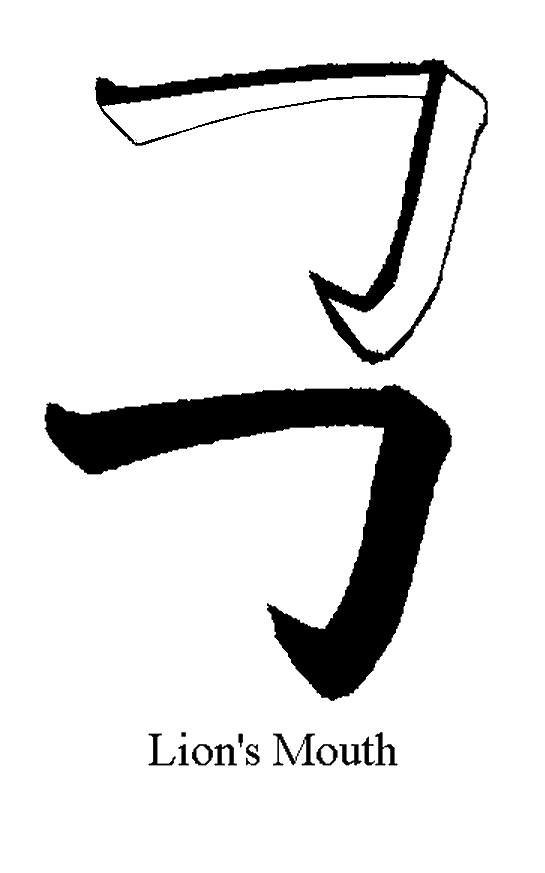
The First one, is the “Lion's Mouth”. This stroke begins with the “Mother Dot”, and the brush is moved to the Right with a “slight” rise until the desired distance is attained. Once this point is reached, a “bounce” will be performed,and the brush will motion downward, motioning to the Left. Once the desired distance is attained, the “tip”of the brush will be “pivoted” upon(sweeping the body of the brush slightly to the Left). The “tip” of the brush then motions to the Left, and the body is raised until the finishing “point” is created.
This next Stroke, is one that is very common amongst many kanji. It is called the “Cover”, officially, it doesn't have a “name” (but “the Cover” is a popular name attributed to it).
The stroke is brushed in the same manor as the “ichi” stroke/kanji is. As the “final” bounce is done, the brush (instead of “rising”) is “drug” downward, and slightly to the Right. This is done to the point that the “tip” of the brush, is equal to the bottom of the initial “Mother Dot's” placement. The “tip” of the brush is then motioned downward, and to the Left. The body of the brush will motion “likewise”, and then will be “lifted” to create the “point” at the exampled position.

The last two strokes in this set are variations on the previous stroke. The first is the "Crown", it is created using the "apricot seed", then brush the "cover".


The last, is the "Treasure Crown". this stroke group is began by first brushing a "Turtle Head"(dot), then brush an attached "Cover".

The Left Hand “Sweeps”
The next “set” of strokes I'll cover, are the “Left Hand Sweeps”. The “First” of these, is the “Pecking Bird” Sweep. This stroke begins with the setting of the “Mother Dot”, and then the “tip” of the brush is pulled to the Left in a Downward “sweeping” action. As the stroke reaches it's desired length, the “body” of the brush is lifted to create the “rising” point (as in the example).
As is evident in the following examples, they are all brushed in similar fashions. The only real “difference” between them, is the overall “length”, and the ending position of the the stroke (which effects the length of the stroke).


The only Left Sweep that has a similarity to the “vertical” strokes”, is the “Variant” of the “Rhinoceros Horn”. It can easily be confused with the “Hanging Spear”(which is a “Vertical” stroke). The “Difference”, is in When/Where the Left Hand “Sweep” of the stroke begins. In the “Hanging Spear” the stroke is “Vertical” until mid-way through it's Stroke. In the “Rhinoceros Horn” Variant, the Left Hand Sweep begins “immediately”.

The Right Hand “Sweeps”
The Next set of “Strokes”, is the “Right Hand Sweeps”. The First of these is the “Floating Goose”. This Stroke begins with the “Mother Dot”, and begins to move “Downward” with a slight “list” to the Left, As the stroke reaches the desired “vertical” distance, the brush is “lifted” slightly (to “thin” the stroke), and then “lowered” as the brush continues the “sideways” portion of the stroke. The “tip” of the brush begins on the Left edge, and as it nears the “turn”, moves to define the “top” edge of the stroke. After the “turn” is made, the brush is lowered (to provide “thickness” to the horizontal portion). The “top” edge of the Horizontal stroke is “curved”to the position where it goes “vertical”, then to the Left. The bottom edge, while “thickening” maintains an “arc” to it, and is pulled past the point where the tip has moved vertical. At this point the brush is “lifted”, as the tip motions to the Left (and upward) creating a “sweeping” point (that distinctively “points” to the Left, at a place “slightly” higher than the beginning position).

This Stroke is called the Long Wave (and it's “variant” the “Playing Fish”) are the most (“commonly”) incorrectly brushed strokes. It requires a lot of practice (for them to be brushed “correctly”). The “Playing Fish” variant, is usually located at the “bottom” of the numerous kanji that it is present in, and the Long Wave commonly dominates the Right side of a character. It should be noted, that the “body” of the brush does the majority of the strokes creation. The “tip” of the brush (after making the “Mother Dot”) Raises slightly, then “sweeps” to the Right, and “downward” (again “slightly). In the Playing Fish variant,Towards the last Quarter of the stroke, it raises again to (almost) the level of the bottom of the (“initial”) “Mother Dot”. The “Bottom” edge of the stroke (being brushed with the “body” of the brush) begins with a “sharp” initial rise, then is quickly angled downward to the Right. As it proceeds through the stroke, it will “thicken”(from a “lowering” of the brush) until it “stops”, and the body of the brush is quickly lifted until the “point” is created.In the Large Wave form, the stroke almost immediately begins to move downward to the right, with the body of the brush forming the Left-hand "corner", and easing pressure until the bottom and Right side form the ending "point" (of the stroke)

The “Playing Fish” (being the “other” stroke commonly “miss-brushed”) Begins as the previous did, the “Mother Dot” is brushed, and the tip is moved to the Right, and creates the “look” of a “shoulder”, with the “tip” creating a curved and downward “sweep”to the Right (all the way to the “point” of the end of the stroke). As in the previous stroke, the “body” of the brush is used to make the “body” of this stroke. Once the “Mother Dot” is completed, the “body” of the brush moves to the Right, then sweeps downward at the desired “angle” while maintaining a (mostly) “straight” edge while “getting” there. The bottom Left “corner”, is (often) most “easily” created, by the use of the “bounce” technique. As this “bounce” is done, the body of the brush is “rolled” while moving “sideways”, and is “lifted” as the bottom edge is created/brought to the ending “point” of the stroke.

Whew! Now that we're done with “those”, we'll go on to “simpler” strokes. The next one, is the “Golden Cone”. This stroke is began with the “Mother Dot”, and is “raised”(only a “little”) and the top edge (being made by the “tip” of the brush) is taken upward at an angle (approx. 45º). The top edge should maintain a “straight” line, the bottom edge of the stroke, should gradually be “thinned”(by raising the body of the brush) until the desired “point” is created.

The Next stroke is the “Bent Pagoda”. This stroke begins as a “vertical” stroke (“thinning” slightly from the top, to the level where it “changes”). It should be noted, that there are versions of this stroke that have “longer”, “Vertical” portions, than other's. Once the desired length has been made, the brush is then “lifted”, and (the “tip”) is moved to the Left, and downward then “reset” (which creates the “finished” corner which is evident). Once “set”, the brush should be motioned upward and to the Right with the body of the brush being lifted (to create the finishing “point”).

The Final (Three) versions of the “Right Hand Sweeps” are similar in execution, but mainly differ in the angle of the vertical portion of the stroke.
The First one, is the “Phoenix Wing”. This stroke begins with the “Mother Dot”, then moves to the Right, Raising at a slight angle. As this stroke reaches the position where the bottom of the stroke, reaches the same height as the top of the initial “Mother Dot” placement, the brush is “re-set” (commonly utilizing a “bounce” to do so) creates a “finished” corner, the stroke then continues (with a change in direction). The stroke (now) begins a downward motion(with the “tip” of the brush “now” following the Left side of the stroke), this downward “sweep” arc's to the Right until it is positioned to the Right and beyond the “turn” (made previously in the stroke). As the brush enter's the final portion of the downward stroke, the “tip” of the brush is moved to the “top” of the stroke and continues upward, the body of the brush will (commonly) utilize a “bounce” to create the “turn” where the brush is moved “upward” and is raised to gradually taper to the ending “point”.

The Final Two “sweeps”, are the “Flying Goose”, and the “Bamboo Crecent”. The “final” portion of the discription given for the “Phoenix Wing”, is identical to what is required for the brushing of these two Strokes. It's “my” opinion, that anyone (with any experience, even from the practice of only the previously shown/described “Strokes”) can determine the necessary motions to create these two strokes. If I'm wrong,....I will write some out. But until I am informed otherwise, I'm just going to provide the “visual” examples (and allow you to “practice” them).


Subscribe to:
Posts (Atom)