Saturday, July 31, 2010

The “Vertical” Strokes

  The First of the “vertical” strokes is the “Long Bow” (and also referred to as the “Dull” Hanging Needle). This stroke begins with the “Mother Dot”, and the brush is pulled straight down. Though with the example provided it's difficult to distinguish it, the Left side has a slight “bow” to it. The Right side is a straight vertical line. Like the majority of strokes, this one “finishes” with a “bounce” to clean the ending edge.

  The “Sharp” Hanging Needle, is similar in appearance to the “Dull” version, except that this one “ends” with a “pointed” end. To brush the “point”, One needs to pull the “point” towards the center while the brush moves downward (this will take care of the Left side of the stroke), as the brush is lowered, it should be raised (“lifted” from the paper) in incroments until the “point” is created. This “lifting” process, is began in the final “fifth” of the stroke.
 The “Carpenter's Square” is the student's introduction to a “Calligraphic” 90º angle. This stroke is began much like the “Rising” or “Horse'sl Bit" is. As it reaches the desired horizontal “length”, a “bounce” is performed (to “clean” the corner), and the stroke immeadiatly is pulled “Downward” to the desired length (then is “finished” with a “cleaning” bounce).


  The “Reverse” Carpenter's square begins like the “Dull Hanging Needle”, though when the bottom of the initial stroke is completed, instead of lifting off of the paper, the brush is pulled to the Right, with a slight upward rise until the desired length is reached and then is “finished off” with the “bounce”. 


  The next vertical stroke, is the “Hanging Spear”. This stroke is actually a combination of a “sweep” and a vertical stroke. This stroke is began like the “Dull” Hanging Needle, but at approximately the “Mid-point” of the stroke, it begins to “curves” to the Left. At the “end” of the stroke, it comes to a “point”, similar to the “Sharp” Hanging Needle, but is “curved” to the Left. When brushing the stroke, the student should maintain the “points” course (on the Left side), and “raise” the Right side of the brush as necessary to achieve the desired “point” at the end of the stroke


   The last of the Vertical Strokes, is the “Dancing Spear”. This stroke is almost identical to the “Dull” Hanging Needle, “except” that at the “bottom” of the stroke, the “point” of the brush is pulled to the Left, and the body of the brush is raised until an ending “point” is created at the desired position. The Dark line in the 2nd image, is indicating where the "point" of the brush should remain while making the stroke.


Friday, July 30, 2010

The Horizontal Strokes

The first of the “Horizontal” strokes, is the “Bowed Horse's Bit” (also commonly known as “Ichi”. This stroke is one of the most utilized Strokes (next to the “Mother Dot”). The stroke is began with the placement of the “mother dot”, then the brush is motioned to the Right, with a slight rise, when examined closely, one can see that it also “narrows” slightly as it rises. When the stroke has “risen” to about a third of the stroke's height, the “tip” of the brush levels out and continues to the desired “end point”. The “bottom” of the stroke continues in an “arcing” fashion to the end point of the desired length. Once the desired length is attained, the brush will execute a finishing “bounce” (as described in the “dots” reference page).


Next, is the “Upward Curving Horse's Bit”. This stroke is began with the placement of the “Mother Dot”, then the brush is motioned upward, and to the Right. If one “notes” the edges of the stroke, the “top” edge has a slight “curve” in it (as it raises to the desired position). The “bottom” edge of the stroke, raises in a “straight” line. Like the previous stroke, it is “finished” with the “bounce” to “clean” the edges.

The last of the Horizontal Strokes, is the “Rising Horse's Bit”. The stroke is placed then begins to raise upward and to the Right (similar to the “Upward Curving Horse's Bit”), In “this” stroke, the “top” edge maintains a “straight” edge, and the bottom has an almost impercievable “curve” throughout the stroke. Just as the other horizontal strokes, this one is completed with a “bounce” to clean the ending edge. 


The Beginning Strokes, "Dots"


I'm going to “begin” this “instruction” project, with the brushing of the “Dot's”. These are the “little” strokes that are common within many of the kanji that student's will be practicing. To the average “observer”, they (can) appear to “all be the same”. For the Shodoka, there is a clear distinction between each of them. The “First” (and arguably, the most “important”) is the “Mother Dot”. This stroke, is used at the beginning of virtually “every” stroke.
The “Mother Dot”(hence the “name”). It is neither “complicated”, nor “difficult” to brush. None the less, mastery of this stroke is mandatory to beginning to perform/learn “Shodo”. The stroke begins with placement of the “tip” of the brush against the paper, then a lowering, and placement of the body of the brush at (an approximate) 45º angle, to the lower right of the beginning placement. The angle is not “actually” a 45º (it's closer to a 50-60º), but it seems to be “simpler” for student's to remember a 45º(?). As the student becomes more comfortable, they can “correct” this minor difference in “description”. As the brush is lowered(at the “end”) one can/will apply a light “bounce”(to create the “clean” rounded end of the stroke). It is fairly common for the “bottom” of the “dot” to become “flattened”. This is usually the result of excessive “pressure” (against the brush), which “flattens” the bristles (creating a “flattened” end of the stroke upon the paper). The “bounce”, should be performed without “lifting” the brush from the paper, the “tip” maintains constant contact, and is never lifted/removed from it. There will be various strokes that also utilize this “bounce”, so the understanding, and execution of it should become “second nature” to the student.


The “Profile” (dot) is next, it is one of the most recognized strokes (by both “shodoka” and Shodo “admirer's” alike). The Profile is commonly located “on top” of a kanji. The stroke is began with the mother dot, but instead of “lifting”(and “re-setting”) it remains “down”, and “drags”(slightly) downward (to the Right), it then is “shifted”(again “slightly”) upward and to the Right. The brush is then lifted, leaving only the “tip” in contact with the center of the dot. The brush should then be motioned “downward” to the Left, and lifted simultaneously (which will leave the slight “tail”).

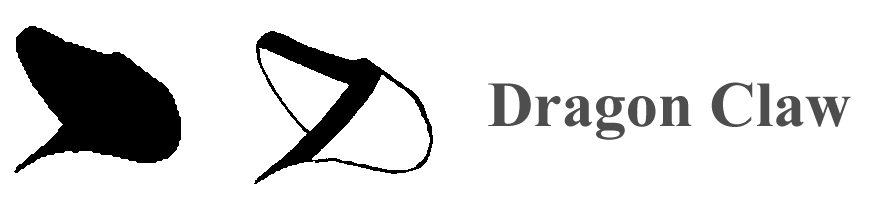
The “Dragon Claw” (at first “glance”) would “appear” to be the same as the “Profile”(dot). Upon closer observation, it can be seen to have distinct “differences”. Those differences are readily apparent when one begins to “make” the actual “stroke”. Once the beginning “dot” is placed, the brush is drawn downward, and to the Right, The example provided illustrates that the “tip” of the brush is drawn downward, and to the right, then is moved to the Left and downward. As it motions to the Left, it is “lifted”(leaving the pointed “tail”). The example drawing (by observation of the inserted “line”) illustrates the path that the “tip” of the brush will take during the brushing of the kanji (“dot”).


The “Apricot Seed” is the next “dot”. This dot can be utilized in varying lengths, and placements. The basic form of the stroke, is began with the placement of the mother dot. Once placed, the brush is drawn downward, and slightly to the left. Once the stroke reaches the desired “length”, the “bounce” is commonly applied (to “clean” the end of the stroke).


The “Plumb Stone” is used in many kanji, and is frequently applied during the creation of “Gyosho” style kanji.To make the stroke, the tip of the brush is placed, then drawn downward and to the Right, when the brush reaches the desired distance, the brush is pulled “slightly” to the Right, and “re-set” (by way of a vertical “bounce”).


The “Turtle Head” dot is most commonly seen on top of the stroke called “The Crown”. It is began by the placement of the dot, then the brush is “swept” to the Right, then is pulled straight down and “finished” with an abbreviated “bounce”.


The last of the “Dot's”, is the “Hatchi” (contraction). These are used in unison and can be seen in various kanji (very commonly in “Gyosho” versions). The dot to the Left, is brushed first, and similar to the “Profile”, and the “Dragon Claw”, this “set” utilizes a “tail”(at the finishing motion of each individual “dot” in the pair). It should be noted, that the “tail”(from the first dot) “points” to the “tip placement” of the second dot. As the second dot is completed, “it's” tail, points towards the bottom of the First dot (creating a “Yin/Yang” sort of feeling to the strokes). 


The Study of Shodo

Shodo, much like a martial art, is studied for a variety of reasons. For most, it's the learning of “how” the Chinese/Japanese kanji should be properly brushed. This is basically a “mechanical” reasoning to it's study. For some, it's a more “mental” pursuit, the study of Shodo requires a “bit” of an “anal” attitude (leaning towards the “perfectionist”) especially when one considers all of the minute features of execution required for many of the strokes, and kanji. Another, is one of a “meditative” (reason) means. It can often be used as an “escape” from one's daily concern's, and allows one to focus on those (many) “details” that are a part of it's practice, and (thereby) “escape” the daily stresses that one may have
. The study of Shodo requires that many minute details of it's practice are adhered to. Contrary to the commonly held believe, it is not necessary that the practitioner (of Shodo) be versed in the language itself. It is very common for a “shodoka”(one who practices Shodo) to be illiterate of the language itself, yet be competent (if not “adept”) at the art of “Shodo”. As one continues with it's “practice”, a student will (naturally enough) “learn” to recognize many of the kanji, and become familiar with their meanings. That doesn't equate to being “fluent” though, it only means they have become “familiar” with the meanings of (some of) the kanji.
I've had numerous student's, who were “artists”(by “hobby”, and/or “trade”) and would begin to study with me, only to “quit”(usually out of frustration with the requirements of it's execution). They (the one's who “quit”) would insist on performing the strokes, in the (or any) manner “they” wished to do so. I found this “odd”, seeing as how it's fairly popular for an artist to study with another (“artist”) to learn their methods of painting. I'm not sure if they viewed it as “beneath” them? (because they equated it to only being a form of “calligraphy”?), or if it was more difficult than they initially believed. “I”, quit worrying about it(long ago).
For my “present” student's (the majority of which are “martial artists”), It's study(“Shodo”) is mostly “mechanical” in nature. It's taught as a requirement for their kyu rank advancement. There's numerous correlations to the practice of a (their) “martial art”, and those will be shown/illustrated, but “their” study, will focus upon the mechanical execution of performing the strokes/kanji themselves.
For the most part, this blog will do likewise (focus on the mechanical execution of the individual strokes).

Wednesday, May 5, 2010

Kamboku

This site was developed to provide methods and examples of Japanese brush calligraphy. I have studied with Nihon Shuji for the past 17yrs, it is the largest calligraphy organization in Japan with a membership of more than 800,000 members and branches in Belgium and the United States. Though not always being prudent in my studies, LOL, I none-the-less DO still practice as regularly as I am able. I previously had a site devoted to this same subject(and under the same name), but found I had not the time to properly devote to it.
I recently decided to “restart” the site (with a “make-over”,LOL), I previously would provide reader's with name translations (in kana) and would occasionally do certificate “models” (via “E-mail”). These would be sent to them and they could do whatever they wished with them. Though not actively doing so now, I have been involved with some interesting projects. Most of these have been “special” order projects for individuals (that I found to be interesting, or unique). There are several sites which will provide certificates (which will state anything you'd like them to), and will charge accordingly for them.
Though I still do (“actual”) brushed projects, I have limited them to my own. Being only moderately computer “savvy”, I'm still in the process of converting those projects to “Adobe” (to a file format that can be enlarged without suffering the effects of “pixilation”, once converted to this format, you could take the file to any “printing” business, and they can print it out to “any” required size and on the paper type of your choice).
I am (deeply, LOL) involved with teaching a “martial art” (that being “RyuTe”). I often find that my own “projects”, revolve around martial arts in general. Seeing that many “sites” utilize brushed calligraphy (on their sites), I “see” a great quantity of it, and a lot of it is (sloppy?) less than what “I” would consider to be either correct, or accurate. I make no claims of being fluent in Japanese, but I am familiar with the use, and manner of presenting a great number of the kanji being utilized. It is not uncommon for individuals to get a Japanese/English dictionary and throw together a couple of kanji and believe that they have “created” the desired word that they are seeking, their usually wrong. This most often applies to (self-imposed) “titles”. Many of which are simply ridicules. Those individuals are basically egotistic, self-absorbed, pompous asses (and are most often involved with some form of a martial art, LOL).
For this site, I will provide various examples, and explanations of the basic strokes involved with the brushing of the kanji. I will also provide numerous examples of kanji which are commonly encountered when exploring the martial arts environment. The most often “debated” kanji (in this field) are those for the “kata”. The reason being that the original kanji was “lost” over time (often from the loss of life during WW2). The individuals connected to the kata (and who “knew” the actual utilized kanji) were killed, or died during this time. Records at this time, were kept on “paper”(much of which was destroyed during the war). What papers there were, were lost/destroyed from the amount of bombing which was done there, and the intended kanji (and therefor the “meaning”) was lost.
For these reasons, I've had numerous debates over the kanji I have utilized for kata names. And for that reason, I will provide only those kanji which are “commonly” utilized, are they correct?, who knows.
One of my (on-going) “projects”, is a computer based kanji dictionary. It is based on the “New Nelson's Kanji Dictionary”. It provides translations/explanations of each of the kanji, and has examples of each of the 4 major styles of writing the kanji (Kaisho, Gyosho, Sosho, and Tensho). This was originally being done for my own use(but having had several “requests” for copies), I am considering offering it here (on DVD only, it has 1.5 GIG of information available on it, to be installed on the purchaser's computer). It also has examples of scrolls, names, places (for practice). There is a schedule of my previous “class” (that I taught on the subject). I've utilized a “browser” based index for navigation of the information. If you are interested, write me here and I will provide more information on the content.