Warm-up Strokes Prior to Brush Practice
Prior to the student practicing the instructed strokes and kanji, the student is advised to perform some (level/amount of) “Warm-up” exercises. Doing so will “re-acclimate” the student with (correctly) using the brush, and will reinforce the instructed methodology's during their practice of Shodo.
Basic guidelines:
The student should sit comfortably (whether at a table, desk or a “Shodo-bench” or where ever they are practicing the the brushing of the instructed techniques.
Their back should remain straight, and the arm's are relaxed.
The brush should be held with the fingertip's and the wrist remaining straight.
The forearm remains parallel to the work surface/paper.
ALL strokes should be performed by motioning the torso, via the waist (the arm should only move minimally, if at all) and never through the wrist.
When the brush touches the paper, it should immediately begin moving.
“Speed” (of brush motion) is determined only by “ink flow” (from the brush), not for attempting to create “effect”. Different brushes hold and release in at different flow rates.
The student should “Exhale” in conjunction with the brushes motion (inhaling when the brush is lifted from the paper).
The Warm-up Practice's Utilized at this school include:
The “Bounce” technique (review)
Correct “Breathing” (Exhale with the stroke, Inhale when the brush is lifted from the paper)
Vertical/Horizontal "End of Stroke"brushing Corner review
Circle (brush control) practice
The “Bounce” Technique
The “name” of this technique can be misleading. The motion is not (literally) a “bounce”, it is a (controlled) raise, and re-setting of the brush. This technique is used for a couple of situations. The most frequent/common use, is when the finishing a stroke (whether vertical or Horizontal) a “Mother-Dot” is set at the end of the stroke (to clean the “outer” edge of the stroke). The next is similar (in results) as the motion is often done when brushing a “corner”(as done in the Carpenter's Square strokes). The last (at least in my own experience) is for aiding in the creation of the (bottom) “corner” (of the “Praying fish”and the “Long Wave” strokes).
To perform this action, the stroke is made, and when the desired position is achieved, the brush (body) is lifted from the paper (leaving the “tip”of the brush in contact with it). This allows any “stray” hairs to realign before the brush is again lowered to the paper. This motion is inclined (though hardly “guaranteed”) to “clean” the outer edges and/or aid in creating a clean “corner”. The motion is easily performed, and (several) students claim to use it for “other” purposes (?) in their brushing of the various “styles” as well. I have no (direct) knowledge of those methods, so I can't confirm/deny any of them (feel free to “experiment” on your own).
Breathing (while brushing Calligraphy)
The “rule” for correct breathing (while brushing calligraphy) are simple, Exhale when the brush is in motion, and Inhale, when the brush is lifted from the paper. Obviously, a slight breath should be taken prior to brushing, but be aware that “Inhaling” while motioning the brush will (often) “mess-up” the stroke being attempted. This becomes more challenging as one becomes more proficient at brushing the character's (kana & kanji), as one is inclined to brush more kanji with each “reload” of the brush.
Vertical/Horizontal Stroke Brushing
This warm-up is intended to acclimate the student to motioning via the “waist” (to produce the brush strokes). The student will first brush a straight line across the top of the page (Left to Right). The stroke is began with the “Mother-Dot” and is continued across the page and is ended/completed with another “Mother-Dot”. This is repeated (Top to Bottom) until the entire page is filled. The student then (beginning on the RIGHT SIDE, in order to acclimate to the Japanese manor of brushing) will set a “Mother-Dot” at the upper-right corner, and pull the brush downward to the bottom of the page. The stroke(s) are alternately “ended”, with (another) “Mother-Dot” and/or a “Tapered Point”.
Variances in stroke thickness can additionally be addressed during this practice. Attention is focused on the brush “Tip” which is maintained along the “upper-edge” (for the horizontal strokes) and the “Left-Side Edge” (for the vertical strokes).
Corner and Connection Review
This exercise begins with the student brushing a horizontal stroke (roughly) a 1/3 the width of the paper. The student then performs a “Bounce” (explained elsewhere), then pulls the brush downward
(towards the bottom of the paper). The student then brushes (another) horizontal line that terminates “within” the vertical stroke (previously brushed. The next stroke begins where the last Horizontal stroke began, and is pulled (directly) downward, the brush is lifted and performs a “Bounce”. The brush is pulled to the right (in the manner used when brushing “ichi”) to the same distance as is (directly) above it. Another “Bounce” is enacted, and the brush is pulled downward. These actions are repeated until two (2) columns of these strokes are completed (see example for clarification).
Numerous aspects to brush use/manipulation can be utilized in this exercise. There can be “width” variations (in either/both horizontal/vertical strokes), “corner” (Carpenter's Square/Reverse Carpenter's Square) review (upper-right, lower-left), “Ichi”. This exercise will remind the student of numerous details when they begin brushing the kanji being practiced.
Circle (brush control) practice
This Exercise is (mainly) used to review the student's ability with utilizing the “waist” to perform their brush motions. The student can choose to begin at the bottom (as shown in this example) or at the top of the paper (it's an irrelevancy). Note that there are no “straight” lines produced in this practice. As soon as the brush comes in contact with the paper, it is motioning in a “curve”. The “circles” can begin in (either) the center (going from smaller to bigger), or on the outer edges initially (going larger, to smaller). The student's focus, should be on their arm NOT moving. All motion should be achieved via the motion of the waist. This is also practice in “upward/downward” brush motion. As the student
motions forward, across and back, they will have to maintain their forearm's distance above the paper.
This will be evidenced through the resultant variances in the produced “strokes”. The “goal” is to maintain a consistent size (of stroke) throughout the individual circles (as well as creating a
“symmetrical” set of circles).
Though “other” rules are regularly followed (when brushing kanji), those will be addressed as the student's instruction proceeds. Initially, the student need only concern themselves with handling and cleaning the Brush (and suzuri) sufficiently, and practicing the stroke's reproduction as shown. Though not (necessarily) “required”, it would be advisable for the student to own a Japanese to English Kanji Dictionary (and learn how to utilize it).
The advantage to familiarization with the instructed strokes (beyond one's ability to brush them), will become evident when using a (or most) “Kanji Dictionary's” (which “I” recommend using “Nelson's Kanji Dictionary”). Most kanji dictionary's are organized by “stroke count” (regardless of which dictionary you use). Being familiar with the strokes (and how they are used in the various kanji) will allow the student to recognize where the strokes are located, and be able to count them.
Prior to beginning the practice of the shown strokes, the student should review (and perform) the “Warm-up” exercises (horizontal and vertical strokes, the “bounce” technique, and the “Circle
exercise”. Doing so will remind the student of the “body-motion's” that they should be utilizing while practicing the brushing of the strokes and kanji.

Tuesday, October 16, 2018
Monday, October 15, 2018
Using the Brush
Using the Brush
There are only a few directives in regards to “how” the brush is utilized when practicing this art.
#1 The brush handle remains vertical throughout the brushing process. Though (obviously) possible to produce certain “effects” by leaning the brush, doing so will create bad habits (and poor results with increased difficulty later) when working on the different “styles” of brushing (“Sosho” in particular).
By leaning the brush, you are changing the area of the brush in contact with the paper. Doing so will also negate one's ability to vary the size of the stroke (by raising and lowering it).
#2 “Breathe” (“exhale”) while the brush is in motion, inhale when the brush is raised from the paper.
This will additionally aid in smoothing out your waist/brush motion (“holding” your breath will cause you to “shake” while moving the brush).
#3 Brush motion is made via the “waist”, NOT the arm. The purpose of the warm-up strokes is to acclimate to this method of using one's body with the brush.
Though “other” rules are regularly followed (when brushing kanji), those will be addressed as the student's instruction proceeds. Initially, the student need only concern themselves with handling and cleaning the Brush (and suzuri) sufficiently, and practicing the strokes as shown. Though not (necessarily) “required”, it would be advisable for the student to own a Japanese to English Kanji
Dictionary (and learn how to utilize it).
The advantage to familiarization with the instructed strokes (beyond one's ability to brush them), will become evident when using a (or most) “Kanji Dictionary's” (which “I” recommend using “Nelson's Kanji Dictionary”). Most kanji dictionary's are organized by “stroke count” (regardless of which dictionary you use). Being familiar with the strokes (and how they are used in the various kanji) will allow the student to recognize where the strokes are located, and be able to count them.
Prior to beginning the practice of the shown strokes, the student should review (and perform) the “Warm-up” exercises (horizontal and vertical strokes, the “bounce” technique, and the “Circle
exercise”. Doing so will remind the student of the “body-motion's” that they should be utilizing while practicing the brushing of the strokes and kanji.
The Basic Tools Used for the Practice of Brush Calligraphy
The Basic Tools Used for the Practice of Brush Calligraphy
The practice of Brush Calligraphy (Shuji) is a skill that has been practiced by (both) Chinese and Japanese martial artists for several hundred years. Though originally only known and practiced by the
“upper-classes”, it was eventually allowed to be practiced by the “commoner's” of those two countries.
The Japanese adopted the use of the Chinese Kanji (brushed character's), but utilized different sounds and pronunciation's for identifying those character's. The Japanese manner of sentence structure was additionally different (from that of the Chinese), so the ability to “read” those writings (between the two) was difficult (and often limited to the upper-classes, who had received training in foreign languages). Being that the majority of the early martial art “master's” were member's of the upper classes themselves (and that Shuji was one of the Budo skill sets) and almost all had received training in that skill.
Eastern cultures will commonly use analogy's to convey particular thoughts and idea's for subjects that may not be readily obvious to the casual observer. This tendency is particularly evident with the
instruction of a “martial art”, and is seen done within their practice of brush calligraphy as well. The Japanese culture is particularly meticulous (in regards to “detail”) with (almost) everything that they assimilate into their culture. The instruction and practice of Brush Calligraphy is no different.
The practice of Brush Calligraphy is in many ways similar to that of practicing a martial art. Despite
that there are numerous “school's” who teach those skill sets, each has (it's own) emphasis on particular aspects of it's practice.
There are hundreds of brush calligraphy school's, and each has it's own way for learning the required motions (to practice that art). There is no (or very little) “right or wrong” way to practice the art of brush calligraphy (Shuji). There are (numerous) “bad habits” that can/will make that study (progressively) more difficult. The purpose for following a particular methodology, is to avoid the
development of “bad habit's and practices” (that will cause the student greater difficulty in their continued practice). What will be shown at this school, is but one of those methodology's. The
methodology that is taught at this school, is based upon the teachings of the “Japanese school of Calligraphy” (Nihon Shuji).
Whether the student is able to “read” (I.E. “translate”) the character's being brushed (or not) is irrelevant. What is of greater importance, is the student's understanding of how to control the brush (efficiently) and their ability to reproduce the necessary strokes that are used in various combinations
to create the desired kanji (Chinese/Japanese character's).
The student's ability to translate the kanji is a study that is beyond what will be provided in this course.
It is recommended that the student obtain a “Japanese/English” Kanji Dictionary to provide them with
a (simple) way to translate the practiced kanji. This school recommends the “Nelson's Japanese/English Kanji Dictionary” for that purpose. It contains the majority of kanji that the student will encounter and/or use during their practice. Another useful (and convenient) text, is the “Kanji and Kana” book. It contains the essential 1945 character's that are taught to Japanese student's during their primary school education. The provided examples (of the kanji) have been brushed (as opposed to “computer generated” examples of the character's).
Oriental brush calligraphy is (generally) divided into several (different) brushing “styles”. The most
commonly seen (and used) is Kaisho (Block-style). It is the style of brush writing that is considered to be the foundation (style) for writing the kanji. It is also the style of brush writing that this course will initially teach to the student. The second style shown, will be Gyosho (semi-cursive). Though being similar to Kaisho, it is a more relaxed version of the that style. The third style shown, will be the Sosho (fully-cursive) style. This style is a more challenging style to (physically) brush (at least correctly). It should be noted that less than 20% of the (native) Japanese population can ever read (much less correctly brush) this style for writing the kanji. The fourth style of writing is Reisho (Cleric-script), this
is a “squared” version of brushing the kanji. Though being a popular style (for brushing “mantra's”) it is not included within the instruction of this course. The final style addressed, is the Tensho (Seal script) style. This is the oldest of the styles addressed by this course. This style is commonly seen being used on “Seal-Stone's” (normally being carved into, or done in “relief” on those seals).
Though commonly believed to of been created sequentially, only Kaisho and Gyosho have (any) such correlation. Various styles were developed from Tensho (and earlier) styles, including Sosho.
The development of the different styles used to write the kanji is extensive, and this course will not be addressing that subject in (great) detail. This course will only address the 4 styles of Kaisho, Gyosho, Sosho and Tensho.
In addition to learning how to brush the Kanji, the student will be introduced to the Kana (writing system). There are 2 “set's” to the (Japanese) Kana system. Each set, consists of 46 character's. They
amount to 2 (different) ways to write (the same 46) “sounds”. They can be thought of as “alphabets” for writing in Japanese. The Japanese use them to represent (or in place of) kanji, that they don't know the (exact) character for.
The first of these set's, is the Hiragana. These character's are brushed in the Sosho style of brushing the Japanese character's. The Hiragana are used for representing/writing “Japanese” words.
The second set, is the Katakana. These character's are brushed in the Kaisho style of brushing the character's. The Katakana are (mainly) used for writing words that are foreign to Japan.
The first task that the student will address is to learn about the various “tool's” used to practice this art.
The “traditional” tools of this art are known as “The 4 Treasures”. These consist of the Brush (Fude), the Inkwell (Suzuri), the Ink (Sumi) and the Paper (Kami). Numerous additional tools are commonly used as well, but those 4 are the “basics”.
We will address these 4 first, then we will include the additional items (as they will prove to be very beneficial to the student's practice.
Fude (brush)
The brush used for Shuji is commonly one that has hair's that are (approx.) 2½” (6.35cm) in length, the “body” of the brush is (approx.) ½ to 5/8” (1.27-1.58cm) in width. This is slightly larger than a brush that would be used for “everyday” writing. The commonly practiced size (of a character/kanji) will be 3”-10” (7.62-25.4cm) square.
A smaller brush with hairs (approx.) 1¼”(3.175cm) X 3/8” (.952cm) is used for signing the student's work, and for “everyday” writing purposes.
These 2 brushes will work for the majority of the assignments that the brush calligraphy student will have.
When a new brush (of any size) is obtained, it will commonly be “starched” (stiff). The starch must be washed from the brush. This is done by placing the brush under running water, and rinsing it out from the “tip” to (about) ¾ up the head of the brush. The student should NOT wash out all of the starch.
After use, the brush is rinsed clean and the hairs are realigned before the brush is hung to dry (a small loop is commonly molded into the opposite end of the shaft of the brush for this purpose).
Suzuri (Inkwell)
This item is designed to be used when the student “grinds” their own inkstick. The suzuri has a flat surface (to grind the inkstick on) called Riku (Land) and the bokuchi (the inkwell) that holds the
water/ink that the inkstick is ground upon. The inkstick is used to pull a small amount of water up onto the land, and the inkstick is held vertically and motioned forward and back, or in a circle while applying downward pressure on the inkstick. This is repeated until the desired consistency is achieved.
Sumi (Ink)
In many “traditional” calligraphy schools, this is the only type of ink used. It is sold in “sticks” (of
varying quality/color). There are readily available selections of liquid ink that the student can purchase
and utilize. Although the practice of grinding ink can become more “relevant” when one is brushing a desired piece (or for a desired consistency of ink), for the purposes of “learning and practicing how to do so”, Liquid ink will more than suffice.
Kami (paper)
The paper used for Shuji is commonly the type (inaccurately) referred to as “Rice Paper”. This paper is very thin, with a smooth and a rough side (the smooth side is the side to practice on). This paper can be purchased in varying qualities and sizes, but the thinner paper that is (approx.) 9½” X 13¾” (24 X 35cm) known as “Hanshi”, is what is commonly used for Shuji practice. Additional sizes are used for varying purposes and if/when those are required for assignments, the necessary details will be provided.
In a more “practical” sense, the student should additionally have the following items:
Bunchin (Paperweight)
This can be any item that can be used to weigh down the upper-edge of the paper. It prevents the paper from “shifting” while the student brushes on it.
Shitajiki (Felt Under-cloth)
This is a piece of felt that the paper is placed upon. It prevents ink (that soaks through the paper) from getting on the work surface underneath.
Fudemaki (Brush wrap)
This item is used to “roll-up” one's brushes when being transported/stored .
Once the student has acquired the basic items, they will begin to learn how to utilize them. Seeing that the beginning student will be using liquid ink, knowing how to grind an inkstick will not be one's initial concern.
Loading the brush
The hairs of the brush should be placed into the ink to absorb a sufficient amount for brushing. It should be approximately ¾ full of ink. The hairs are straightened by using the edge of the suzuri. This
action will help to remove any excess ink in the brush. Be sure to only pull the brush hairs against the edge (so as to not damage/twist them). All of the hairs should be straight and should form a “point” at the tip.
When the student holds the brush, they should only use the crease of the first joints of the finger's being used. The pad of the thumb will press against the brush providing stability. There are several ways that are commonly used for this grip. The student should experiment, and find which is more comfortable for themselves. Once the student begins brushing, the shaft of the brush should always remain vertical until the brush is lifted from the paper.
Oriental Brush Calligraphy Course
Introduction for the Oriental Brush Calligraphy Course
taught at the Ryu Shin Kan/Ken Shu Kai Dojo
Much like what is being shown in the student's instruction for learning Oyata Te, brush calligraphy consists of numerous details that are utilized in it's practice. Though often (incorrectly) stated, brush calligraphy motions cannot be practiced with a pen or a pencil. There are “brush-pens” that have a felt tip that allows for a similar type of practice, but it should be recognized that the use of an (actual) brush, is different.
Unlike the practice of a defensive methodology, Shuji (brush calligraphy) is an individual/solo pursuit. Aside from that distinction, Shuji shares many of the same challenges (for instruction/learning) that the study of a martial art/defensive methodology does. Both consist of basic motions and techniques that effect the results of the students efforts. Both allow for individual variations (that will still adhere to the instructional tenets of the art).
It is often believed (by “new” student's) that the different “styles” are (progressively) learned and have a direct correlation between them (in relation to their order of instruction). This is an inaccurate
assumption. Kaisho (“block style”) is recognized as the “standard” manner/style used for brushing kanji (Chinese character's). It examples the “recognized” standard for brushing the kanji. Tensho (“seal script”) was (one of) the oldest/original forms for brushing the kanji. It is now (mainly) seen in use upon Hanko (seal stones). Gyosho (“semi-cursive”) is the more commonly seen style and is used for everyday writing. Sosho (“fully-cursive”) has more correlation to Tensho, than it does to Kaisho (so no, it did not evolve from Kaisho, Sosho is an older style of writing than Kaisho, it has more in common with Tensho, than Kaisho).
The different styles of brushing the kanji, are taught in relation to their frequency of use (by the average individual). This means that the modern student will (commonly) begin with learning the Kaisho style, followed by learning the Gyosho style. Sosho is the third style taught, and is more commonly (if not only) seen on artistic pieces and/or is being practiced by student's of brush calligraphy. Tensho is the final style that is addressed, and is only seen (in common use) upon Hanko (whether personal or business/organizational seals).
This course is based upon the student learning the necessary techniques (via use of the brush) to create the kanji (in the 4 listed “styles”). That instruction will (mainly) focus on the student brushing the kanji in the Kaisho style of brushing the kanji. The techniques used in brushing the other styles, will consist of various modifications being made to those brushing techniques.
Instruction will begin with learning the creation of the basic strokes and will evolve into their (combined) use when brushing the kanji. That instruction is done in the Kaisho style of brushing. As the student progresses, the use of the Gyosho style is introduced and practiced.
This course focuses on the Japanese use of the kanji, and therefor must address the use of Kana. These are the two (additional) sets of character's that are used by the Japanese. Those sets are known as the Hiragana, and the Katakana. These are 2 sets of 46 phonetic character's (each) that represent specific sounds. They are used to write the “sounds” of the desired kanji, when that kanji is unknown. The Hiragana were created from pieces of kanji that were brushed in Sosho, the Katakana were created from pieces of kanji that were brushed in Kaisho. The Hiragana are used to represent “Japanese” words, and the Katakana are used (mainly) when writing words that are foreign to Japan.
For the student of Japanese brush calligraphy, these two styles can additionally be used to practice their abilities with those two styles (Kaisho & Sosho) of brush writing.
Thursday, August 31, 2017
Available Books for the student of Shodo
These books were written and illustrated by myself and provide examples for the new/experienced student to utilize for practice/learning examples of the various Brush Calligraphy subjects.


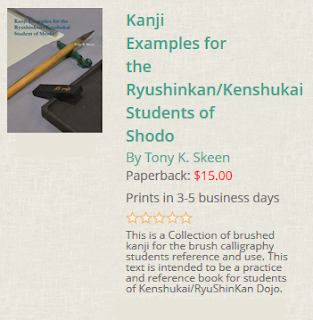


These books can be found and purchased at LuLu.com (4 - 8 day average delivery time)


These books can be found and purchased at LuLu.com (4 - 8 day average delivery time)
Monday, January 16, 2017
The “Dot” Debacle

I recently had a (“newer”) brush
calligraphy student object, if not “protest” over my critique of their use of
the same “dot” (exclusively) within several different kanji, and
often when utilized multiple times within a kanji that contains
multiple versions of the “Dot” strokes. Knowing the individual's
inclination to “short-cut” (anything) whenever they can, I wasn't
surprised by their outcry, only disappointed that I had failed to
convey the principle sufficiently to them with my tutelage.
I believe this student is additionally
a “victim” of the (majority of) brushed “Chinese”
kanji dictionary's that I have encountered (and own). I'm aware that
they have one as well (and regularly utilize it). The majority of
“Chinese” kanji dictionaries that I've seen, are inclined to
(only) utilize “1” type/style of “dot” in their kanji
reproduction. In regards to “reading” the kanji, it makes no
difference. But in regards to Shodo, (aesthetically),
it does. It needs to be remembered (and was pointed out to the
student), that the practice of “Shodo”, is a visual
art/practice.
The recognized Shodo master's of the
past (and present) provide unique variances to their individual
pieces. The style I teach is that of the Nihon Shuji (Japanese
Calligraphy Association), within their style of brushing, they teach
8 (variations of) “Dot's to utilize within the Japanese kanji. It
(soon) becomes apparent, that within those kanji that have “multiple”
dot's, each of those utilized are different.
The inclusion of those “different”
Dot's, is what adds to the uniqueness of the individual kanji. It
also aid's in maintaining the student's focus while brushing
the kanji. It's easy for the student to become obsessed with the
longer strokes (which do warrant attention), but the dot's can
(often) “make or break” the final version of the produced kanji.
Dot's can add personality to the piece and convey the desired
attitude (of/for the brushed kanji), depending on “how” those
dot's are brushed (thick/thin/angled/curved, etc.).
When every “dot” is reproduced in
the “same” manner, that task is more difficult (and gives the
produced kanji, a “manufactured” look). The Japanese have an
affinity for “Nature” (and those things that at least “appear”
to be naturally occurring). “Uniformity”, is a manufactured
result (it rarely occurs in nature). This could be why the Japanese
(prefer?) that different dot's be used? Regardless, the utilized
Tehon (clearly) example those dot's within them, a
student should not make an “assumption” that the dot's utilized
are all brushed in the same manner. A large part of a student's
practice, is learning to recognize variations in the exampled
strokes. The dot's are as important as the longer pulled
strokes.
“Dot's” utilized in the Nihon
Shuji style of Brush Calligraphy:

The Mother Dot

The Profile Dot

The Dragon's Claw (Dot)

The Apricot Seed (Dot)

The Plum Stone (Dot)

The Turtle's Head (Dot)

The Hatchi Contraction
(This is a combination of variation's for the Dragon's Claw & the Profile Dot's)
The following combinations are not "official" Dot's, but are commonly encountered within numerous kanji.

Radical 10 (at bottom of a kanji)

Radical 12 (at top of a kanji)

Radical 85 (on Left side of Kanji)

Radical 86 (at bottom of kanji)
As can be seen, the dot's utilized "could" have been brushed alike, but the variation adds to the kanji (which they are utilized within when used in this combination).
These are the 2 "Whips" taught within the Nihon Shuji Strokes.
The upper one is used in one of the examples above, the lower one is seen in numerous kanji.

This Left Sweep is also "not" (officially) a "Dot", though it is often utilized in a similar fashion to one, as seen above.
Wednesday, November 4, 2015
Product Review 2
Plastic Suzuri


If your looking for a non ("less")- breakable Suzuri (ink well) that can be utilized for grinding ink "sticks" as well, I and several students have been utilizing suzrui similar to one shown here. They are 2-sided, one for "bottled" ink (though either could obviously be utilized) and one for "grinding" an ink stick (as done with the "stone" versions). These are pretty inexpensive ("cheap") at $6-$10 dollars, and seem to be working very well.
Being that they are pretty durable, one doesn't have to be as concerned about dropping them (and then having them "break"!!!). they are the "standard" size of (approx.) 3" X 5" (+/-).
Thursday, January 29, 2015
Western (American/European) Name Conversion to Kanji Character's
Western
(American/European) Name Conversion to Kanji Character's

This
collection is being presented in the expectation of making the
conversion of Western names (sounds) being translated to Japanese
Katakana an easier process.This is most commonly done for the purpose of creating "seal stones" (names carved upon soft-stone seals, most commonly for validation purposes and are very popular for use upon "Martial Arts" certificates).
Though
(initially) not a particularly difficult task, if/when one wants to
then match similar sounding Kanji to that task, it can become
very time consuming (and often with numerous options being
presented). The purpose of this blog, is to (attempt to) make
that process easier (though probably not any simpler, LOL).
It
is our hope, that the user has the basic understanding that Japanese
kana (the “katakana” in this case) have only “1” way/manner
that they can each be pronounced (unlike English, which has
several for each). There are certain modifier's that can be
added to those kanji to produce “unusual” (at least to the
Japanese) sounds.
There
are 5 (basic) Japanese vowel sounds,
A
, which is the “Ah” sound as in fAther
I
, which produces the long “E” sound as in unIque
U
, which is “U” as when used in rUde
E
, which is the “A” sound in yEt
O
, which is the “Oh” sound in hOpe
Just
remember, “ah, ee, uo, aa, oh”. They won't change.
These
sounds are then combined with the other letters (except for “L”,
and “V”, the Japanese don't use them at all, or ever
in Japanese).
When
viewing the “Katakana Chart”, it's easy to see how their words
are structured.
A,
I, U, E, O.....
KA,
KI, KU, KE, KO,
SA,
SHI, SU, SE, SO
TA,
CHI, TSU, TE, TO
NA,
NI, NU, NE, NO, ...etc.
The
most common difficulty everyone has, is with the fact that they don't
have “CI” or “SI”, and they don't have “TU” or “HU”.
“CI” is replaced with “CHI” “SI” is replaced with “Shi”,
and “TU” is replaced with “TSU” and “HU” is replaced with
“FU”.
There
were several others that were eliminated years ago (as in many).
Hence
they're not used at all today, except in foreign (to Japan)
words. These were the WI, WU, WE combinations, as well as the YI and
YE sounds. When speaking English, it's easy to mistakenly
default to the CI, SI, TU and HU combinations, remember to not
use them, and change to the Japanese CHI, SHI, TSU and FU. TSU
and FU are also pronounced differently (than in English). TSU is
spoken as (if) you were to place the tip of the tongue to the roof of
the mouth (behind the teeth), then say “Sue”. FU is pronounced by
using only the lips (no teeth on the lower lip) as if/when blowing
air through a straw. This makes for some odd sounding
translations (initially), but a Japanese speaker would
recognize/understand them. Note also that “WO” is pronounced “O”
(when reading Japanese). The “W” is pretty much silent.
One
needs to keep in mind, that when writing someone's name in Japanese,
you do so with the intention that if/when someone who is
Japanese, will be able to read/translate it to sound correct
to you (when that person
reads it aloud).
The
most common mistake, is “assuming” that everyone's name is
written the same way (as in English). Depending on how the
individual person prefers their name to sound/be pronounced is
what will determine how it should be written (in katakana).
When
sounding out the person's name (for translation purposes), Speak the
name in the manner they wish it to sound. It can be a mistake
to (slowly) break the name into individual vowel sounds that are
slowly spoken. As example, I use my own name...”Tony”.
This is a simple (enough) name to say, and translate. It consists of
2 syllables (“To”, and “NI”), Yet when written/translated
into Japanese, most individual's (Japanese and American, both)
commonly screw it up. They
sound it out (aloud) and slowly
and think “Tooo”, and “NIIIIII”. This becomes written as
“ToooooNIIIIII” (this is not
how I say my name! LOL). My name is written as “TooNI” (with no
more elongation than
necessary).
When
converting a Western name to kana (katakana), there are often several
ways it can be written. There are NO (absolute) Right or Wrong ways
to do it. Just remember that it is based upon the “sound” of the
name. You (presumably) would prefer it to sound as close to how you
would say it as is possible. Naturally, for certain names that
contain sounds that the Japanese language doesn't utilize, this
becomes tricky (some compromises have to be accepted).
This
is hardly a Life or Death
issue, (but it distinguishes the professionals
from the amateurs as
well). I view it as if I wrote your name as “boob” (instead of
“bob”). It sounds “close”, so I don't know why you would mind
if I just called you “boob” all the time (would you?). And of
course anyone else
that was able to read
the katakana, would also
consider/call you “boob” as well (it's close enough,
right?).
When
translating a name to katakana, the sounds are usually (pretty)
straight forward (to match to the corresponding kana). It's only when
you encounter names that have sounds (within them) that are difficult
to simulate with the kana that the task becomes difficult.
If/When
converting a Western
name to kanji (for
use upon a name seal),
the task is (usually) more time consuming.
When
creating a name seal, it isn't necessary to include/utilize any of
the elongation “symbols” that are being used to brush the name
when writing in katakana (on the seal stone itself). This is
different than when
writing the name out in katakana. A name seal is usually “stamped”
directly upon, or immediately following the brushed katakana that is
used for the name (as “validation”).
*note,
Katakana is rarely (if ever)
used for making a “name” seal stone, it's considered "tacky" and amateur.
Once
the subjects name is written out phonetically,
you can then list (all of) the kanji that match each
of those vowel sounds. Some names can have pages
of options available, and some will only correspond to a few (those
are the more difficult to create).
Once
this is done, the “trick”, is to match the correct sounding kanji
(together) to sound similar
to a sentence, poem or Haiku. This can be descriptive of the
individual, or even of/for their desires or interests. The creation
of a name seal can be very “artistic” (or even sarcastic,
LOL). There are no “set rules” (when it comes to creating a
“name seal”). The more “individualistic”, the better.
Some like them to be simple, and some like them to be so
subtle that only a very few would even understand the
translation, it's up to that
person as to what it will be.
Examples
can become quite
elaborate, “Man who travels the world and carves Dragon
bones”, it obviously takes (a
Westerner, LOL) a fair amount of time to combine the correct kanji
(sounds) to create something like this, but if/when one has the time,
it can become quite entertaining.
Once
the acceptable kanji has been determined, you then need to establish
the Tensho version of
the chosen kanji (Tensho
is the standard style of kanji utilized for name seals). If/when the
seal is for a school/dojo, the task is usually simpler (simply look
up the desired Tensho
version of the kanji that are utilized in the name of the school).
Various Tensho
dictionary's are available for just this purpose.
With
this information, you can either carve the (reversed) Tensho
kanji onto the seal, or have it done for you (through numerous sites
on the internet that do so for a fee). The majority of sites also
sell the seal stones, which you will have to choose (size/shape is
only by personal preference, there is no set size. Shape, Style that
is mandated for any of the types of seals). Charges, are usually made
by number of kanji required (ie. long names can get very expensive,
LOL).
Blank
Seal stones can be purchased for varying amounts, and in (equally)
varying sizes. For a “name” seal stone, the size is usually kept
under 2” square (which is fairly large for a name seal). The more
common (in Japan) are under ¾” (square), they also tend to
have shorter names. There are varying rules depending upon the specific use, establishment and city that one will/can use a name seal. Theft of a (registered) seal is
roughly equivalent to stealing a credit card, though it
technically has no monetary value.
In
the West (U.S.A.), the use of a seal stone is more commonly (if not
“only”) seen upon “Martial Arts” certificates (in conjunction
with the instructors/presenter's name, also written in katakana).
It's really a matter of personal “taste”, but excessively large
Name seals give the appearance of (inflated) “ego”.
If/When
making a seal stone for a school or organization, this size
restriction doesn't really apply. Stamps are often used as validation
of a certificate and are commonly “over” sized (4” X 4” +).
When used for “Martial Arts” purposes, the association/school
seal provides validation that the certificate was issued by that
organization/school. There are commonly 3 (or more) “official”
seals that are utilized for this purpose.
Thursday, January 9, 2014
Product Review
(Review)
"Rewritable" (practice) Paper
One of the newer trends in brush calligraphy, is using rewritable practice paper. I've recently purchased some examples of these (in various sizes) and (so far) they're kind of "fun" to practice with. They certainly are more convenient to use for practice, they have a lower potential for making "messes" and they don't "use up" valuable materials ("paper, ink").
In the past, I've had students use the small (and inexpensive) "chalk-boards" for temporary/repetitive brush practice. The major drawback to "that" method, was the reflection of "Paper/Ink" interaction (they were different between the two, which could lead to a false sense of ability with the "chalk-board" method).
The paper is utilized by "wetting" the brush (similar to "inking", but it's an acquired knowledge, much like learning how much ink to use. The differences in consistency between the two mediums is easily learned though, and shouldn't be a concern), Then using just as with ink upon the paper.
The paper doesn't tend to "bleed" too badly at all (which I admit was my initial concern). Drying/recovery time will be dependent upon the level of Humidity present where your at. I live in the Midwest (Kansas city, Missouri), it's the middle of winter (15 degrees outside) and we don't own a humidifier. Drying time is (on average) about 10 to 15 minutes.
Considering the savings in material (alone), I feel this is an acceptable "inconvenience". If your looking to practice the basic "strokes" (or even complete "kanji") I think this medium is definitly worth the (minor) investment.
The "average" cost (via "E-bay") is (presently) around $10 for 10 of the smaller "sheets" (approx. 10" X 15") or a single Large sheet for $20 (approx.17" X 28"). The prices vary (I've seen them as high as $75 for the large one), but "shop" around, there are numerous people selling them.


There are also sheets for practicing the various "strokes" (I have one of those as well), but (IMO) they aren't very good "examples" and would instill bad practice habits through their use. "I" don't recommend them.
You won't be able to use your "regular" brush(es) on the paper though, as residual "ink" (in your brush) will permanently mark the practice paper. They are intended to only have WATER utilized on them. They (often) come with a brush that can be used (and obviously hasn't been used with "ink"). Though not of the best quality, they will serve the purpose. If you don't care to use the supplied brush, you can use your own (NEW) brush, just remember to not use it for your "inked" projects, LOL (unless you don't plan to use it upon the "rewritable" paper anymore).
I also acquired one of the "scroll" practice sheets, again, I don't care for the examples, but they do offer the ability to practice a consistent "size" and placement for a (horizontal)"scroll". The characters are approx. 1-1/2" and there are about 8 kanji/column and approx. 20 columns. The entire sheet is approx. 18" X 48". Though "they" recommend the use of a "small" brush, I had no difficultly brushing them with the larger (2-1/2") brush. (I can guarantee you that you won't be able to brush the complete sheet, before the first one's are dry, LOL).
Over all, though the "feel" is not exactly like that of using "ink" on paper, for practice/learning purposes, I think these are something that should be investigated, and determined if they would serve your practice purposes. The "cost" is cheap enough, that you shouldn't get hurt (too badly, LOL) even if they aren't for you.
"Rewritable" (practice) Paper
One of the newer trends in brush calligraphy, is using rewritable practice paper. I've recently purchased some examples of these (in various sizes) and (so far) they're kind of "fun" to practice with. They certainly are more convenient to use for practice, they have a lower potential for making "messes" and they don't "use up" valuable materials ("paper, ink").
In the past, I've had students use the small (and inexpensive) "chalk-boards" for temporary/repetitive brush practice. The major drawback to "that" method, was the reflection of "Paper/Ink" interaction (they were different between the two, which could lead to a false sense of ability with the "chalk-board" method).
The paper is utilized by "wetting" the brush (similar to "inking", but it's an acquired knowledge, much like learning how much ink to use. The differences in consistency between the two mediums is easily learned though, and shouldn't be a concern), Then using just as with ink upon the paper.
The paper doesn't tend to "bleed" too badly at all (which I admit was my initial concern). Drying/recovery time will be dependent upon the level of Humidity present where your at. I live in the Midwest (Kansas city, Missouri), it's the middle of winter (15 degrees outside) and we don't own a humidifier. Drying time is (on average) about 10 to 15 minutes.
Considering the savings in material (alone), I feel this is an acceptable "inconvenience". If your looking to practice the basic "strokes" (or even complete "kanji") I think this medium is definitly worth the (minor) investment.
The "average" cost (via "E-bay") is (presently) around $10 for 10 of the smaller "sheets" (approx. 10" X 15") or a single Large sheet for $20 (approx.17" X 28"). The prices vary (I've seen them as high as $75 for the large one), but "shop" around, there are numerous people selling them.
There are also sheets for practicing the various "strokes" (I have one of those as well), but (IMO) they aren't very good "examples" and would instill bad practice habits through their use. "I" don't recommend them.
You won't be able to use your "regular" brush(es) on the paper though, as residual "ink" (in your brush) will permanently mark the practice paper. They are intended to only have WATER utilized on them. They (often) come with a brush that can be used (and obviously hasn't been used with "ink"). Though not of the best quality, they will serve the purpose. If you don't care to use the supplied brush, you can use your own (NEW) brush, just remember to not use it for your "inked" projects, LOL (unless you don't plan to use it upon the "rewritable" paper anymore).
I also acquired one of the "scroll" practice sheets, again, I don't care for the examples, but they do offer the ability to practice a consistent "size" and placement for a (horizontal)"scroll". The characters are approx. 1-1/2" and there are about 8 kanji/column and approx. 20 columns. The entire sheet is approx. 18" X 48". Though "they" recommend the use of a "small" brush, I had no difficultly brushing them with the larger (2-1/2") brush. (I can guarantee you that you won't be able to brush the complete sheet, before the first one's are dry, LOL).
Over all, though the "feel" is not exactly like that of using "ink" on paper, for practice/learning purposes, I think these are something that should be investigated, and determined if they would serve your practice purposes. The "cost" is cheap enough, that you shouldn't get hurt (too badly, LOL) even if they aren't for you.
Sunday, June 2, 2013
Kanji Example Requests
Having been presented with numerous requests for "Martial Arts" kanji, I'm presenting some of those requests here.


Atemi Kaisho Atemi Sosho

 Dan Kaisho/Sosho Kyu Kaisho/Sosho

Kyusho Kaisho Kyusho Sosho


Seito Kaisho Seito Sosho


Sensei Kaisho Sensei Sosho
If anyone is curious about any others, let me know (It's just good practice for me, LOL).


Atemi Kaisho Atemi Sosho


Kyusho Kaisho Kyusho Sosho


Seito Kaisho Seito Sosho


Sensei Kaisho Sensei Sosho
If anyone is curious about any others, let me know (It's just good practice for me, LOL).
Monday, April 22, 2013
Stroke to technique relation
As I have mentioned previously, Shodo has numerous
relationships to the practice of “Te”. The first example I
usually “point out” is the stroke for “Ichi” (“one”). The
stroke begins with the “mother dot” (set at it's usual 45°
angle) moves to the right in a slight arc, ending slightly higher
than it started, and finishes with an “ending” dot (again, at the
45°angle).
This motion is performed just like a “milking” punch motion is done in Taika Oyata's version of “Te”. The motion begins with the hand positioned at an approx. 45° angle (in front of the hip, to the front side of the torso). The hand moves forward with a slight rise, until it makes “contact”, at that point the “fist” makes a slight “milking” action, akin to the wrist motion made when using the bokken (wooden sword).
In Taika's book, “Te No Michi”, Taika makes reference to a technique (which he was told, by one of his instructors to “figure out”). Taika states that he was able to determine the correct technique execution by/from the “kanji” (the “written” name of the technique). He unfortunately, doesn't name the technique (or the kanji Which, “I” really wish he would have,..sigh..). Also, now names are often “made up” (just for a reference) by various instructors because, Taika doesn't give/have any “official” names for Techniques.
At present, I'm working on “Sosho”(fully cursive) brush writing (less than 20% of Japanese can even read it, much less write it! LOL) It can be a challenge just finding examples (of a particular kanji). I fortunately have a “decent” amount of example books I can refer to. I was practicing “Te” (hand) in Sosho, and as I did the “strokes” it reminded me of one of the combination motions we teach. During a class (later) I had my partner throw a “face” punch, and executed the motions I had been practicing (with a brush) and it “worked” (it was already very close to “how” we do the motion anyhow). Although it was “interesting”, was it a “correct” technique? I don't really know. It worked, so I would have to say “yes”, but can it be replicated with any other “Kanji” (shrug?). It may have been simple coincidence. But I do think it may be something (if nothing else, than for personal amusement) to explore.
Anyone, can “relate” what-ever they do (carpentry, football, golf, painting) to Martial Arts practice. This (particular) “art” or “way” (shodo) has plenty of Martial Ways” (Iaido, Kendo, Shodo “obviously”) that use it as a “supplemental” art, to aid in the various individual “ways”. It teaches the breathing method that is prevalent in all of them. It teaches the “concept” of being “fluid” and relaxed (during execution). It teaches the Idea of “using the body” for motion (from the “hara” or “center”). It develops concentration and of course the concept of “doing something correct the first time” (as it's your only opportunity). For myself, it also offers “me” an escape from all the “hassles/frustrations” in my life. If for some reason, I'm not able to “empty my cup” LOL, before I begin to practice, it definitely shows (in my “failed” or “poor” calligraphy attempts).
(As an interesting note, “Handwriting analysis” actually began in the “far east”, with brush writing. When one brushes kanji, the “mood” of the writer is VERY apparent. Which is why Copying any of the writings of the “masters”, be it of calligraphy, martial arts, etc. is so popular. If one can reproduce the style of the “master” [of what-ever] then the individual can possibly capture the “spirit/mood” of those masters or at least, so the thought goes).
Subscribe to:
Posts (Atom)